
Stelo Technical Documents
Using Db2 HADR with SQDR
Last Update: 2024/03/26
Product: SQDR Plus and SQDR
Version: 6.34 & later
Article ID: SQV00PL082
Abstract
The Stelo Data Replicator solution uses dedicated IBM Db2 LUW databases for Tier 2 staging databases and for the Tier 3 control database. The contents of these databases is constantly changing during operation and tightly linked to the current state of SQDR.
This technical document describes how to use the high availability disaster recovery (HADR) feature of Db2 LUW to provide a high availability solution for both partial and complete site failures. It can also be used to avoid downtime during upgrades of hardware, operating system, Db2, or SQDR.
HADR protects against data loss by replicating data changes from a source database, called the primary database, to the target databases, called the standby databases. HADR supports up to three remote standby servers. Typically, one standby server is located close to the primary server (e.g. in the same data center) and receives updates from the primary very quickly and is available to be deployed for HA (high availability); one or two auxiliary standby servers may be located at a remote location and are used for DR (disaster recovery).
As documented here, the solution does not provide automatic failover; this is a function of Pacemaker (and prior to that, Tivoli System Automation for Multiplatforms (TSAMP)) which are available only in Linux environments and have not been verified for use with SQDR.
This document is applicable to both Windows and Linux and requires manual intervention to activate the standby. We recommend customers test and create site-specific documentation and scripts so that they are prepared to act quickly if and when a failover is needed.
Overview
This document describes the simplest case of one primary and one standby, which can be either local (HA) or remote (DR). A future revision of this document will describe setting up multiple standbys.
Procedure:
- Confirm pre-requisities
- Choose SYNCMODE
- Overview of the Setup Procedure
- Install & license Db2, SQDR & Plus on the standby
- Set up the primary for HADR
- Copy the backup to the standby
- Set up the standby for HADR
- START HADR on the primary
- Use db2pd to verify HADR status
- Replicate Derby tables and configuration files to the standby
- Test a TAKEOVER
- Test reverting to original primary
Configuration Changes
Updates
Updating Db2
Ongoing Maintenance
Monitoring
Removing a data from HADR
Limitations
Troubleshooting
Hints
Known Issues
References
Planning and Prerequisites
Download, unblock, and expand the zip file containing the scripts and unblock the PowerShell scripts if necessary. The zip file contains the following scripts:
- primary.ps1: run this on the primary system.
- standby.ps1: run this on the standby system.
- db2clean.ps1: an example script demonstrating automated clean up of Db2 archive logs.
- takeover.ps1: an example script demonstrating HADR takeover of multiple databases.
The primary and standby systems must be running
- The same operating system family (Windows or Linux). The particular OS version is not important as long as the same version of Db2 can be installed.
- The same architecture (e.g. Linux on Intel can not be mixed with Linux on POWER)
- The same major version of Db2 (e.g. 11.5). The standby can be temporarily at a higher fix pack level when HADR is used to provide Db2 services while performing a rolling update. See references below for IBM documentation on performing updates (fix pack updates) and upgrades (major release).
- The same version of SQDR (6.34 or later). A future document will describe the recommended procedure for updating SQDR in an HADR environment.
Both systems should have the same disk layout (although the size of the disks may vary) and the same paths for tablespace containers. For example, on Windows we recommend using three disks:
C: - system
S: - Db2 table spaces
L: - logs and other Db2 information
Other Considerations
The scripts assumes the following:
- When the Db2 databases are changed from circular logging to archive logging, that the archive logs will be stored in L:\db2archivedir (Windows) or ~db2inst1/db2archivedir (Linux).
- The DB2INSTANCE instance name is the same for both primary & standby.
Both the primary and standby systems should be able to access the T1 (source) and T4 (destination) databases. For example, if these systems are being access by name, DNS should resolve to the same location.
Unless you are using a StarLicense Server, you will need Stelo licenses for both primary & standby servers.
User Authorities
- The user name and passwords for local SQDR user (e.g. sqdr) and the Derby user SQDR (used for SQDR Control Center) should be the same on all systems.
- Using the same userID and password for the Db2 service user (typically db2admin on Windows, db2inst1 on Linux) is recommended but not required. Since the Db2 service user should be granted dbadm on the database so that maintenance operations succeed; you will need to grant dbadm to both Db2 service users if the names differs.
- Except for running db2pd and start/stop of services, the scripts and other tasks can be run from a non-elevated PowerShell window.
- However, the userID being used to run the scripts needs the following Db2 authorities:
- Authority to run BACKUP and RESTORE - this is at the instance level and controlled by the OS group DB2ADMNS if it exists (where the setting for DBM CFG is db2 update dbm cfg using sysadm_group DB2ADMNS). However, there are other ways that a user may be acquire this authority e.g. being a Windows administrator for the machine or the domain.
- dbadm authority within the database. See Db2 Administrative Authorities for suggested methods for granting dbadm to a user.
Firewalls and Port Assignments
If a firewall is enabled, create exceptions for the HADR ports on all systems. Default values are in the range 50500-50599. Unless you configure otherwise, SQDRC will use 50599 and SQDRPn will use 50500+n - e.g. SQDRP5 will use 50505.
Each database requires its own HADR port, but you can use the same port on all systems, assuming no conflicts with other applications.
Also create an exception for port 1527 (Derby) on the standby.
If you are running Data Replicator Manager or SQDR Control Center remotely, add exceptions for those applications on the standby (we can assume the exceptions already exist on the primary). e.g. 7737 & 7738 for Data Replicator Manager and 8080/8443 for SQDR Control Center.
ODBC Drivers & Data Sources
Using Data Replicator Manager, determine if any third party ODBC drivers are being used for source or destination objects. These will be need to be installed on the standby system.
Also determine if any ODBC data sources are being used (rather than ODBC connection strings). These DSN's will need to be created on the standby system.
Perform Db2 Maintenance before Deploying HADR
If the SQDR Plus system has been running for a while, the storage used by the staging databases may have grown. You can examine the size of the directories under S:\DB2\NODE0000 (assuming that S: is the drive being used for database storage i.e. where table spaces are stored). We recommend performaing storage maintenance before setting up HADR to avoid creating and transferring huge backup images and replicating the storage bloat to the standy system. See Db2 LUW Staging Database - Storage Maintenance.
TCP/IP Keepalive Parameters
See the IBM documentation for Configuring TCP/IP keepalive parameters.
Choosing SYNCMODE
The choice of HADR_SYNCMODE is dependent on network connectivity between the primary & standby systems and the balance between transaction loss vs higher transaction response time.
The choices are:
- SYNC
- NEARSYNC
- ASYNC
- SUPERASYNC
For an HA deployment (colocated primary and standby), NEARSYNC is the preferred choice.
For a DR deployment (remote auxiliary standbys), you must use SUPERASYNC.
See the IBM documentation for HADR Synchronization Mode and the related section in the Db2 HADR wiki for additional details and considerations.
The SYNCMODE in effect is defined on the primary. For example, if SYNCMODE on the primary is set to NEARSYNC, then that mode is used for communication to the first standby defined in the HADR_TARGET_LIST, and SUPERASYNC is used for communcation to any auxiliary standbys (2nd and 3rd in HADR_TARGET_LIST). The SYNCMODE values on any of the standbys only have meaning when that standby becomes the primary.
For a good illustration of how the four sync modes differ i.e. what constitutes a COMMIT, see this explanation in this April 2020 IDUG presentation Theory to Practice: HADR in the Real World by Ember Crooks, starting at 11:40.
PROCEDURE
Overview of the Setup Procedure
- On the primary, run primary.ps1 to
* Set HADR properties in the database
* Enable archive logging
* Perform an offline backup - Transfer the backup to the standby
- On the standby, run standby.ps1 to
* Restore the backup
* Set HADR properties in the database
* START HADR ON DATABASE database AS STANDBY. - On the primary:
enter the command START HADR ON DATABASE database AS PRIMARY. - Repeat for each database of interest.
- Copy Derby tables and configuration files to the standby.
- On the standby (first time setup):
do a Takeover
Instantiate Java stored procedures
Verify functionality
After the initial setup, services can be left running on both systems and roles can be transferred back and forth with the DB2 TAKEOVER commands.
Install Software on the Standby
The standby system should match the primary system as closely as possible - see Planning and Prerequisites.
- Install & license Db2, SQDR & SQDR Plus on the standby.
- Install any necessary third party ODBC drivers.
- Use ODBC Administrator to create any necessary ODBC data sources.
- Stop SQDR services except for SQDR Derby.
- Verify firewall exceptions.
Set up the Primary for HADR
This step will involve a disruption to services while the databases are configured for archive logging and a backup is created.
- Determine which databases are used by SQDR:
A Db2 LUW database named SQDRC is typically used for the Tier 3 control database. Use of a SQL Server control database is out of scope for this document.
There will be one or more Tier 2 staging databases named SQDRPn, where n is an integer. To identify the staging databases in use, use SQDR Control Center to select the top object in the tree on the left (the name of the system) and examine the ControlDB column in the right panel. The database called SQDRPLUS is a Derby database that will be handled separately.
- Examine the PowerShell script primary.ps1 to see if you will need to override the default values of any parameters.
- Use DB2 GET DB CFG FOR dbname and examine the LOGARCHMETH1 value to determine if archive logging has already been enabled; a value of 0 indicates that circular logging is being used (default setup). If archive logging has already been enabled, you may want to override the value for archivedir when invoking the script.
- Stop all the SQDR services.
- Run db2 list applications to verify that there are no active connections to SQDRC or SQDRPn. This is necessary to perform an offline backup.
- For each database of interest on the primary, run the PowerShell script primary.ps1. This does not need to be run elevated, but it should be run by a user that has privileges to set parameters within the Db2 database and to run backups.
If you do not specify any values on the command line, you will be prompted for:
- Hostname or IP address of the primary system (this machine)
- Hostname or IP address of the standby system (the remote machine)
- Name of database
All parameters can be overridden if you specify them on the command line e.g.
./primary.ps1 -dbname "SQDRP0" -hadr_remote_inst "db2inst2" -hadr_syncmode="NEARSYNC"If the script completes successfully, you may resume the SQDR services.
- The backup images are written to the $home directory (C:\users\username on Windows). Copy the backup to $home on the standby.
Possible Issues:
The script attempts to perform some operations (such as checking for port in use) on the remote system. If the invoking user lacks authority on the remote system (e.g. if the PowerShell script is running as a local user such as .\db2admin rather than a domain user), connecting to the remote server will fail. You can either ignore that error (if you are confident that the port is not in use on the remote system) or add -Credential (get-credential)to the remote invocation, which will display a pop-up dialog to enter credentials for the remote system.
$results = Invoke-Command -ComputerName $hadr_remote_host -ScriptBlock {Get-NetTCPConnection | where Localport -eq $using:hadr_remote_svc}-Credential (get-credential)
Set up the Standby for HADR
- Examine the PowerShell script standby.ps1 to see if you will need to override the default values of any parameters.
- Deactivate and drop the database If it already exists on the standby. This will be the case for SQDRC, which is created automatically by the SQDR Plus installer.
db2 deactivate db SQDRC
db2 drop db SQDRC
- On the standby, run the PowerShell script standby.ps1. This sets various Db2 parameters, restores a backup, and invokes START HADR ON DATABASE database AS STANDBY.
Note:
- If you do not specify any values on the command line, you will be prompted for:
- Hostname or IP address of the standby system (this machine)
- Hostname or IP address of the primary system
- Name of database
- All parameters can be overridden if you specify them on the command line. Specify -hadr_syncmode="SUPERASYNC" for a remote standby.
Start HADR on Primary
Return to the primary and invoke (for each database)
db2 START HADR ON DATABASE database AS PRIMARY
On both primary and standby, run db2pd (from an elevated db2cmd window) to examine the state of HADR; address any issues.
db2pd -hadr -d database
or
db2pd -hadr -alldbs
Replicate Derby tables and configuration files to the standby
The Db2 databases are only part of an SQDR configuration; additional information is stored in the Derby database SQDRPLUS and in text files (e.g. agtN/sqagent.properties). This information is relatively static, but any future changes will need to be replicated.
Derby
The most important table is SQ_AGENTS. You will need to replicate this table again if any agents are added, if source or destination URL's or passwords are changed, or if the name property is configured.
We also recommend replicating SQPKGINFO (this indicates whether the Launch Agent needs to rebind packages in the staging databases after an update to SQDR Plus) and SQ_PROPERTIES (if it exists; this table is used for global settings). SQPKGINFO should be created with the option Create if does not exist; else use existing.
IMPORTANT: be sure to replicate or preserve the indexes on the Derby tables. If you are using SQDR snapshot to perform the replication and the destination table already exists, either select the checkboxes on the Indexes panel or select Use Existing Table on the Destination panel.
Since
To replicate the Derby tables, you can either
- use Derby table export/import via CSV files as described in SQDR Plus: Migrating to a New Server
or
- (recommended) use SQDR to setup a snapshot replication from Derby on the primary system to Derby on the standby system. This replication should be run once during initial setup, and can be run again later to propagate configuration changes such as new agents or source/destination password changes. It should be run only when the original primary is active. Be sure to replicate or preserve indexes.
When creating SQDR source and destination, use the StarSQL ODBC driver with connection strings such as
HostName=mylocalhost;Port=1527;Server=SQDRPLUS
Configuration files
Copy sqdr.properties from C:\ProgramData\StarQuest\SQDR (/var/sqdr on Linux) to the same location on the standby system.
For the contents of C:\ProgramData\StarQuest\sqdrplus\ (/var/sqdrplus/ on Linux):
Copy the contents of the conf directory, including the agtN subdirectories, to the same location on the standby system. Note that you will be overwriting node.properties & sqagent.properties; you may want to save a copy of the original file somewhere. If additional agents are created later, you will need to copy the agtN directory for that agent. If any agents are modified later, you will need to copy agtN\sqagent.properties.
If you are using Google BigQuery, copy the directory gbq.
If you have customized any services (e.g. set up Jetty for SSL setup), you may need to copy wrapper-local.conf for that service.
If you are using SSL connections to source or destination databases, or have configured SSL for jetty, you may need to copy the certificate store cacert.
Test a TAKEOVER
Planned Takeover
For a planned role switch (e.g. for planned maintenance, such as rolling updates) do a graceful takeover. This guarantees no data loss, and automatically changes the role of the original primary database to standby, and the role of the original standby database to primary.
On the primary system:
- Stop the SQDR services
- Run db2 list applications to verify that there are no active connections to SQDRC or SQDRPn.
On the standby system:
- For each database, issue the command
db2 takeover hadr on database dbname
If you have a number of databases, we recommend creating a script in advance so that the takeover can happen quickly. A sample script takeover.ps1 is provided.
Use db2pd -hadr -alldbs to examine the HADR state.
Forced (Unplanned Takeover)
- For a forced (unplanned) takeover, you may need to append BY FORCE to the command:
db2 takeover hadr on database dbname BY FORCE - The possibility of data loss depends on the synchronization mode and the activity level of the database (i.e. were there transactions in progress).
- Special actions may be required to prevent a split brain situation (two primaries). Verify that the original primary is *not* accepting connections to Db2.
- When the original primary is ready to re-join after a forced takeover, run DB2 START HADR ON dbname AS STANDBY and verify the status with db2pd, after which it can do a graceful takeover to reclaim its original role.
For both planned and unplanned takeover:
After the original standby has finished its takeover of the databases:
- Instantiate the stored procedure JAR file if necessary. This is a one-time process, but may be needed for any new databases.
- Create the directory C:\ProgramData\IBM\DB2\DB2COPY1\function\jar (Windows) or /home/db2inst1/sqllib/function/jar (Linux)
- Run the following from a db2cmd window:
db2> connect to SQDRP0 user sqdr using password
db2> CALL sqlj.replace_jar( 'file:C:\Program Files\StarQuest\sqdrplus\capagent\UDBProcs.jar', 'CAPTUREPROCS_JAR' )
or (Linux)
db2> CALL sqlj.replace_jar( 'file:/opt/stelo/sqdrplus/capagent/UDBProcs.jar', 'CAPTUREPROCS_JAR' )
db2> commit
db2> disconnect SQDRP0
Note that the commit command is essential.
Repeat if needed for all SQDRPn databases.
- Start the SQDR services.
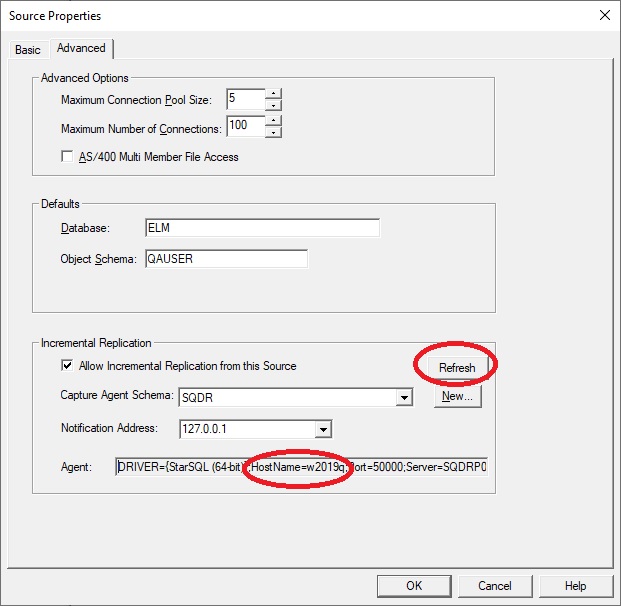
- In Data Replicator Manager, notice that the incremental replication groups are in error (red) because Tier 3 cannot connect to Db2 on the the original primary server.
To resolve this: click the Refresh button on the Advanced panel of each source. The displayed connection string should show the hostname of the now active SQDR system (what was the original standby server):
Test reverting to original primary
The procedure for a planned role switch back to the original primary is similar to the original switch:
On the original primary system (which is currently the standby):
- For each database, issue the command
db2 takeover hadr on database dbname - Start the SQDR services if they are not already running.
- On the Advanced pane of each source, click the Refresh button and verify that the displayed connection string is correct.
Once all the configuration files etc are in place, you can leave the SQDR services running on both systems and switch back forth with just the db2 takeover hadr on database dbname command. On the standby system, SQDR Manager will display agents with an icon that represents standby:
After issuing the the db2 takeover hadr on database dbname command, the Launch Agent will detect the change after a minute and automatically start the agent. Multiple agents are handled sequentially, so it might take several minutes to complete the switch.
The SQDRSVC (Tier 3) service is not yet HADR-aware. The service will fail to start If the SQDRC control database is not available (i.e. on the standby system) and will need to be manually started using the Services Control Panel or net start sqdrsvc after takeover of the SQDRC database. On the original primary system, the service will continue to run after a role transfer, but will not perform any replications (as expected); Data Replicator Manager will display unusual error messages that can be ignored.
Configuration Changes
The examples below expect that the changes are made on the primary system, and list the updates that need to be made to the standby.
Modifying an agent:
- Copy agtN/sqagent.properties.
- If the changes involve source password changes or the name property is used, replicate the Derby table SQ_AGENTS.
- Exception: if the clientODBCString is used in the configuration, you will need unique copies of agtN/sqagent.properties unless you also use a DNS entry to represent the current primary system.
Adding an agent
- Replicate the Derby table SQ_AGENTS.
- Copy the new agtN subdirectory.
- If the new agent is using a new staging database, set up HADR for that database.
Deleting an agent
- Delete the agtN subdirectory.
- Replicate the Derby table SQ_AGENTS.
- If the deleted agent was the only agent using a staging database, deactivate and drop the database on both primary and standby systems (in either order)
db2 deactivate db SQDRPn
db2 drop db SQDRPn - If you later create a new agent that re-uses that SQDRPn database name, restoring the backup on the standby may fail with:
SQL1036C An I/O error occurred while accessing the database. SQLSTATE=58030
If this occurs, restart the db2 service (on the standby).
Tier 3 configuration
Changes made in Data Replicator Manager (sources, destinations, subscriptions, groups, and RBAC-related information) are stored in the SQDRC control database and are automatically replicated to the standby. This is also the case for changes made with PowerShell or the SQDR Properties application and for RBAC changes made in the SQDR Configuration application.
If there is a change to the credentials or connection information used to access SQDRC (typically done in the SQDR Configuration application), you will need to copy the modified sqdr.properties file to the standby.
Updating hardware, operating system, Db2, or SQDR software
Typically updates are performed in the following order:
- Install the update on the standby system.
- Transfer the active role is the standby system.
- Install the update on the original primary system.
- After the original primary system is updated, transfer the active role back to it.
In IBM's documentation, the term Update refers to minor updates such as Db2 fix packs; it may also apply to operating system or hardware upgrades that do not affect Db2. The term Upgrade refers upgrading Db2 to a new major release.
References
- Rolling updates with multiple HADR standby databases
- Applying rolling updates to a Db2 high availability disaster recovery (HADR) environment
- Upgrade Db2 High Availability Disaster Recovery (HADR) environments
Updating Db2
On the standby:
- Update Db2.
- Reboot if necessary.
- Stop the SQDR services.
- Takeover the databases.
- Run db2updv115 -d database from a Db2 command window to update the system catalog. It is not necessary to stop Db2 operations or run this from an elevated command window.
- Verify connectivity e.g. with db2 connect to database
- Start the SQDR services and verify operations.
On the original primary:
- Update Db2.
- Reboot if necessary.
- Takeover the databases if you wish to return this system to its original primary role.
Note that it is not necessary to run db2updv115 or re-bind on the second system, as changes to the database are replicated via HADR.
Ongoing Maintenance
Because the Db2 databases are now using archive logging rather than circular logging, a scheduled task should be created to clean up older archive logs to avoid filling the disk. This task only needs to run on the primary system, since the standby never archives log files; it will start archiving only when it changes role into a primary. See the example script db2clean.ps1 (included with hadr.zip).
If Db2 storage maintenance (REORG & ALTER TABLESPACE REDUCE MAX) is performed on the primary, the changes are automatically replicated to the standby system.
Monitoring
db2pd
Run the db2pd from an elevated command window to get status information:
db2pd -hadr -d database
or
db2pd -hadr -alldbs
See Wiki: Monitoring HADR for more information.
If you have more than one standby, issue db2pd on the primary, as it is aware of all standbys; each standby only knows about itself and the primary.
MON_GET_HADR table function
The MON_GET_HADR table function provides the same information as "db2pd -hadr". It can be accessed from any client (db2pd can only be issued from one of the HADR systems) and it is more friendly to database admin tools, but it requires a SQL connection to the database. Monitor queries can be issued to the standby database only when reads on standby is enabled.
Example: Here is some PowerShell code (extracted from db2clean) that uses MON_GET_HADR to obtain the STANDBY_LOG_TIME. Note that we use the MIN() function as the results may consist of multiple rows if there are multiple standbys.
set-item -path env:DB2CLP -value "**$$**"
db2 connect to $dbname user $user using $password
$sql = "SELECT MIN(VARCHAR_FORMAT(STANDBY_LOG_TIME, 'YYYYMMDDHH24MI')) from table(MON_GET_HADR(NULL))"
$standby_log_time = ( db2 -t -x $sql )
See the IBM documentation for more information, including a list of column names, data types, and descriptions that are returned for MON_GET_HADR:
MON_GET_HADR table function - Returns high availability disaster recovery (HADR) monitoring information.
Db2 Data Management Console (DMC)
IBM Db2 Data Management Console is a browser-based console that helps you administer, monitor, manage, and optimize the performance of IBM Db2 databases.. It can be configured to monitor HADR databases and send alerts for issues. DMC is typically installed on a system other than the systems being monitored and uses its own Db2 LUW repository database for historical information. It can be installed on any Windows or Linux system with Db2 LUW and access to the systems being monitored, or you can download and deploy an IBM-supplied Docker container.
- Downloading and Installing IBM Db2 Data Management Console 3.1.x
- Db2 Data Management Console Docker container
- High availability disaster recovery (HADR) system monitoring
- Alerting users to HADR-specific issues
- Configuring the email server
Removing a database from HADR
If you decide to revert to a single system environment, perform the following steps for each database. It is important to avoid the split brain scenario -where you end up with indepedent copies of the database - since that might result in multiple instances of SQDR attempting to peform replication to or from the same databases.
On the standby:
db2 deactivate db database
db2 drop db database
on the primary:
db2 stop hadr on db database
You may get the following error when activating the database after stopping HADR:
SQL1117N A connection to or activation of database database cannot be made
because of ROLL-FORWARD PENDING. SQLSTATE=57019
Run the following command to resolve this issue:
db2 rollforward db database to end of logs and stop
Removing the HADR-related configuration within the database is optional, as those properties are ignored if HADR is not started on a database.
You may choose to return the database to circular logging.
Limitations
This document assumes a combined tier environment; the process can be modified for split tier environments.
Additional steps are needed if Tier 3 is not using a Db2 LUW control database named SQDRC - e.g. the database has a different name or SQL Server is being used for this purpose.
Agent logs (e.g. C:\ProgramData\StarQuest\sqdrplus\conf\agtN\capture_agent0.log) and wrapper logs are not shared. To view the logs for any events that happened while the standby was active, you will need to examine the standby system, and there will be apparent gaps in the logs on the primary system after control returns to the original primary.
Troubleshooting
Unable to start HADR
If you are unable to start HADR, see the IBM documentation for SQL1768N Unable to start HADR. Reason code = reason-code.
Some of the common issues are:
SQL1768N Unable to start HADR, Reason Code = 7
This usually indicates a network connectivity or misconfiguration issue. Verify that both systems agree on the ports being used, and that the ports are not being blocked by a firewall.
Unblocking a file (Windows)
Symptom:
If you get the error primary.ps1 is not digitally signed. You cannot run this script on the current system, then the file needs to unblocked:
Right-click on the file and select properties. If the General information says Security: This file came from another computer and might be blocked to help protect this computer, select the Unblock checkbox and click Apply.
Problems starting agents on standby
Symptom:
On the first attempt to start SQDR Plus on a new standby system, the agents all appear in error (rather than the expected Running or Standby state), and the one of the first messages in the Launch Agent diagnostics is something like:
WARNING: [sqv][WrapperSimpleAppMain][Jan 31, 2024 9:10:01 AM] CaptureAgentLog: main
java.sql.SQLSyntaxErrorException: Syntax error: Encountered "<EOF>" at line 1, column 626.
...
at com.starquest.sqdr.capture.control.ControlTable.modifyDataBaseRow(SourceFile:133
at com.starquest.sqdr.capture.control.AgentTable.setAgent(SourceFile:163)
Solution:
Be sure you have replicated or preserved indexes for the SQ_AGENTS Derby table.
Symptom:
Agent diagostics contains the following error:
com.ibm.as400.access.AS400Exception: CPF2451 Message queue CALOGQ is allocated to another job.
or
com.ibm.as400.access.AS400Exception: CPF2403 Message queue CAQ in SQDR not found.
Solution:
Restart the agent.
Other Hints
The value of the pruneRetention property in the Tier 2 agent configurations should be 0 (default), as it offers no benefit for an HADR scenario.
Known Issues
References
- IBM Db2 Documentation for HADR
- IBM documentation: Initializing high availability disaster recovery (HADR)
- Db2 HADR Wiki
- Wiki: HADR Takeover
- Step by Step Procedure to set up HADR replication between DB2 databases
(This is a tutorial that illustrates a simple setup, but is not complete or up-to-date)
- IBM Redbook: High Availability and Disaster Recovery Options for DB2 for Linux, UNIX, and Windows October 2012
- IBM Redbook: Using Pacemaker to Create Highly Available Linux Solutions on IBM Power December 2023
(note that Linux on POWER is not a supported environment for SQDR, but generally-applicable information may be gained from this Redbook)
DISCLAIMER
The information in technical documents comes without any warranty or applicability for a specific purpose. The author(s) or distributor(s) will not accept responsibility for any damage incurred directly or indirectly through use of the information contained in these documents. The instructions may need to be modified to be appropriate for the hardware and software that has been installed and configured within a particular organization. The information in technical documents should be considered only as an example and may include information from various sources, including IBM, Microsoft, and other organizations.