Connect to the SQDR Control Center with a browser as described in Connecting to SQDR Control Center.
Logon as user SQDR, using the Launch Agent Control Database (Derby) password as supplied during installation.
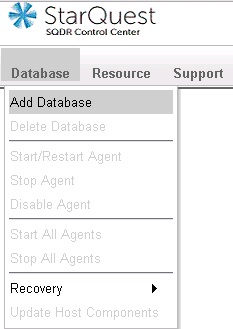
Select Add Database from the Databases drop-down menu.

Choose the appropriate source database type (Microsoft SQL Server) and select Continue. You will see the following screen:
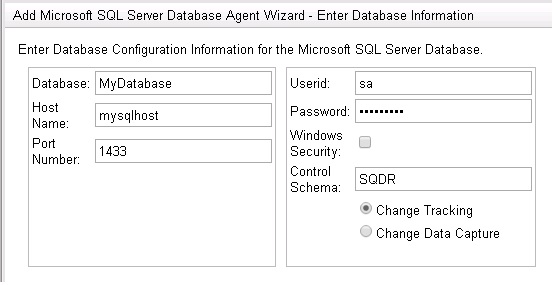
Enter the following values:
Database: source SQL Server database name.
Host Name : Host Name or IP address of the source system. If you are using a named instance of SQL Server, specify the instance name here - e.g. mysqlhost\MYINSTANCE.
Port Number: enter the port of the source system. This field can be left blank if SQL Server is listening on the default port (1433) or if SQL Server Browser is running on the source system, which is typical if you are using a named instance and dynamic ports. See the Microsoft KB article Configure a Server to Listen on a Specific TCP Port for further information.
Userid: a SQL Server user on the source system with authority to create tables and stored procedures in a new schema (e.g. SQDR) on the host database and to alter the database and all subscribed tables to use CHANGE TRACKING.
Password: password for the Userid.
If you select Windows Security, you do not supply a Userid and password, but the SQDR Plus services should be running as a Windows user that has the authority to perform the above tasks. This option is not applicable if SQDR Plus is running on a Linux system.
Control schema: use the default value (SQDR) unless there are multiple SQDR Plus systems accessing this host database. SQDR Plus will create this schema on the host database and populate it with control tables and stored procedures.
Change Tracking or Change Data Capture: choose the desired method of acquiring changes. Change Data Capture offers a number of advantages over Change Tracking (more granular changes, support for replication using unique indexes as well as primary keys, ability to use the compareChangeData property to enhance performance), but requires that the source system be running the Enterprise Edition of SQL Server, and that SQL Server Agent be running. Change Tracking works with all editions of SQL Server, and requires that all subscribed tables have primary keys.
Select the Next button. You will see the following screen:
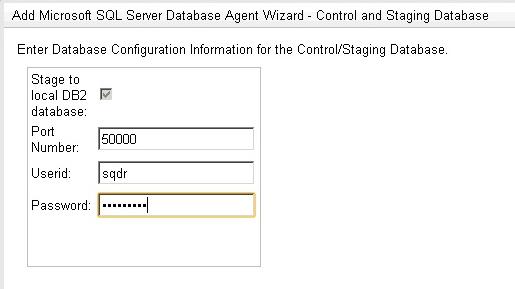
Enter the following values:
Stage to local DB2 database: enabled (default)
The values below Stage to local DB2 database refer to the local Db2 for LUW database system which was installed as part of the Tier 2 SQDR Platform Prerequisites.
Select whether to create a new control database or select an existing database from the dropdown. If you choose to create a new control database, supply the following:
Port Number: enter the port of the local Db2 database. Default is 50000.
Userid: enter sqdr.
Password: enter the password of the Windows or Linux user sqdr created on the SQDR Plus platform as part of the Tier 2 SQDR Platform Prerequisites.
Select the Next button and configure the logging and optional email notification values. You can leave these fields blank during the installation and configure the email notification feature at a later time.
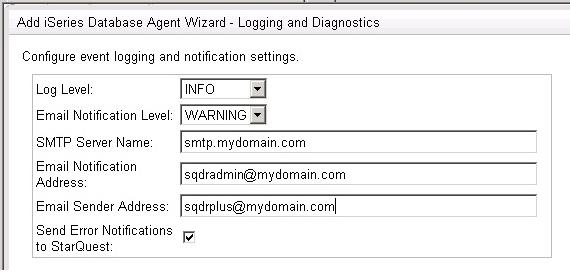
Select Next to create the Agent. This operation may take a while.
When you see a plus sign next to Databases, expand Databases and select the new database.
Choose Start/Restart Agent from the Database drop-down menu.
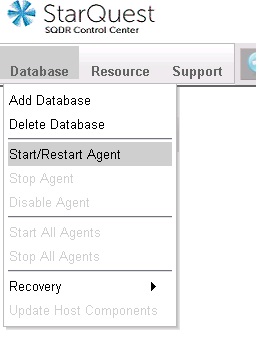
Selecting Start/Restart Agent creates the Staging Agent on the SQDR Plus system, and creates configuration tables and stored procedures on the source system. This process may take several minutes; a green checked icon will appear next to the database name when the process is complete. If the icon remains red, additional troubleshooting may be required before proceeding.