
Stelo Technical Documents
Using the Stelodata Lake Sink Connector for Azure Databricks
Last Update: 16 May 2024
Product: StarQuest Data Replicator
Version: SQDR 6.20 or later
Article ID: SQV00DR051
- Abstract
- Prerequisites
- Databricks Setup
- Create a SQL Notebook and Destination Schema
- Databricks Scala Notebook Setup
- Creating an SQDR destination using the Simba ODBC driver
- Configuring SQDR incremental group
- Creating a Subscription
- Agent parameters
- Spark Connector Status
- TLS/SSL Connectivity to Tier 2 Db2 LUW staging database
- Reference
- Troubleshooting
- Hints & FAQ
Abstract
Replicating data to Databricks and Data Lake storage can be accomplished in several ways:
- Using the traditional SQDR four tier model, where Data Lake Storage (tier 4) is accessed using only the Simba Spark ODBC driver (provided by Databricks) running on tier 3.
- Running Scala code in a notebook in the Databricks cluster to pull changes from the tier 2 staging
database.
There are two methods in which the notebook can be run: ApplyJdbc.run and ApplyJdbc.apply. The following
describes the differences between the two methods
ApplyJdbc.run- Intended to support the "Run once and exit" mode of the Scala code.
- Supports a single Tier 2 Agent.
- Connects directly to the Tier 2 staging database.
- Used to minimize the cost of Tier 4 processing when low latency is not the primary requirement.
ApplyJdbc.apply- Intended to support �continuous� mode.
- Supports multiple Tier 2 Agents.
- Connects to the Tier 3 control database (typically SQDRC).
- Preferred method for ease of configuration and low latency results.
- May be more expensive as it involves running the Tier 4 cluster continuously to achieve low latency.
The subject of this technical document is running Scala code in a notebook in the Databricks cluster to pull changes from the tier 2 staging database. Stelo also supports replicating to Databricks with Unity Catalog support.
Prerequisites
- SQDR and SQDR Plus 6.20 & later.
- Combined tier environment (both tier 02 and tier 03 residing on the same system).
- The control database for SQDR should be a local IBM Db2 LUW database named SQDRC, with control tables located in the schema SQDR (i.e. default configuration). The use of Microsoft SQL Server or remote control databases is not currently supported.
- Need Databricks account admin who can manage the Azure Databricks environment including creating workspace and cluster, enabling Unity Catalog and running the notebooks.
- Network connectivity (typically port 50000) from the Databricks environment to Db2 LUW running on the SQDR system is required. A VPN may need to be configured or a firewall exception may be required. See SSL for configuring TLS/SSL connectivity.
- Verify that the password for the Windows user sqdr is known. If the environment is Linux, ensure that the password for the sqdr user is known
Databricks Set Up
Preparing Databricks environment
To replicate data into Databricks, a workspace and a cluster must be created. For more information on how to create a Databricks workspace and cluster, refer to Databricks setup.
Uploading replication libraries onto the Databricks cluster
After the cluster is created, do the following:
- If uploading the libraries to a DBFS
- Go into the newly created cluster.
- Select Libraries > Install New > DBFS.
- Upload the following JAR files
- SqdrSparkApply.jar
- Can be found from C:\Program Files\StarQuest\sqdrplus\Tools - db2jcc4.jar
- Can be found from C:\Program Files\IBM\SQLLIB\java - db2jcc_license_cu.jar
- Can be found from C:\Program Files\IBM\SQLLIB\java
- SqdrSparkApply.jar
- Start the cluster.
- If uploading the libraries to a Unity Catalog volume
- Go into the newly created cluster.
- Upload the following JAR files into the UC volume.
- SqdrSparkApply.jar
- Can be found from C:\Program Files\StarQuest\sqdrplus\Tools - db2jcc4.jar
- Can be found from C:\Program Files\IBM\SQLLIB\java - db2jcc_license_cu.jar
- Can be found from C:\Program Files\IBM\SQLLIB\java
- SqdrSparkApply.jar
- Select Libraries > Install New > Volumes.
- Select the JAR files that were uploaded from step 2.
- Start the cluster.
Create a SQL Notebook and Destination Schema
If desired, create a destination schema (rather than using default) by creating a Notebook with language SQL and entering and running the command CREATE SCHEMA MYSCHEMA. The SQL notebook can be used later for verifying replication results.
Create the Databricks Scala Notebook
This notebook, when executed, will talk to SQDR Plus (Tier 2) to pull the data from the source system. We need to create it on Databricks and pass on the required parameters for the ApplyJdbc.run or ApplyJdbc.apply method.
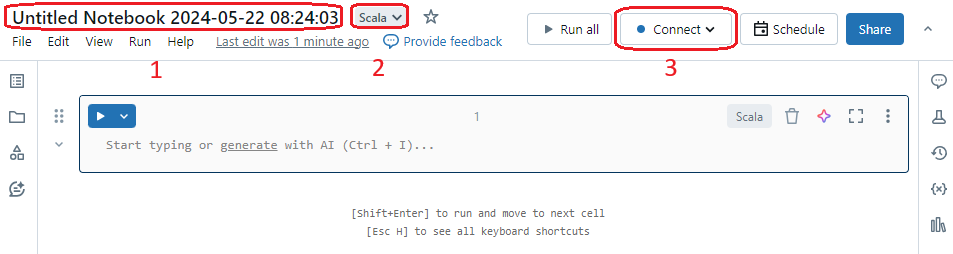
- Select the + sign in the left column and select Create Notebook.
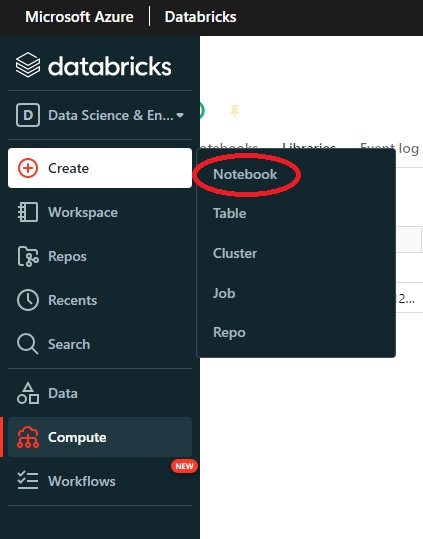
- Enter a name for the notebook (1), select the Default Language as Scala (2), and select the newly
created cluster (3).
- Paste this Scala code into the notebook and
change the appropriate values. After filling in the required values, choose which method to use
(ApplyJdbc.run or ApplyJdbc.apply) and comment/uncomment the appropriate sections.
For more information on the parameters, their values, and how to retrieve the values, refer to reference.
For more information on how to connect to the staging database using SSL / TLS, see SSL.
- To make sure the notebook is configured properly, select Run all to run the notebook. Observe that the version number SqdrSparkApply.jar is displayed at the bottom of the screen. Watch this area for job progress.
-
To view the resulting data, create a new notebook of type SQL and enter a SQL statement.
OR
Select Data from the left column and navigate to Database and Table. You can view the schema, sample data, creation and modification dates.
Running the Scala notebook
It's recommended to use a Databricks job to run the Scala notebook. For more information, refer to this document.
Example: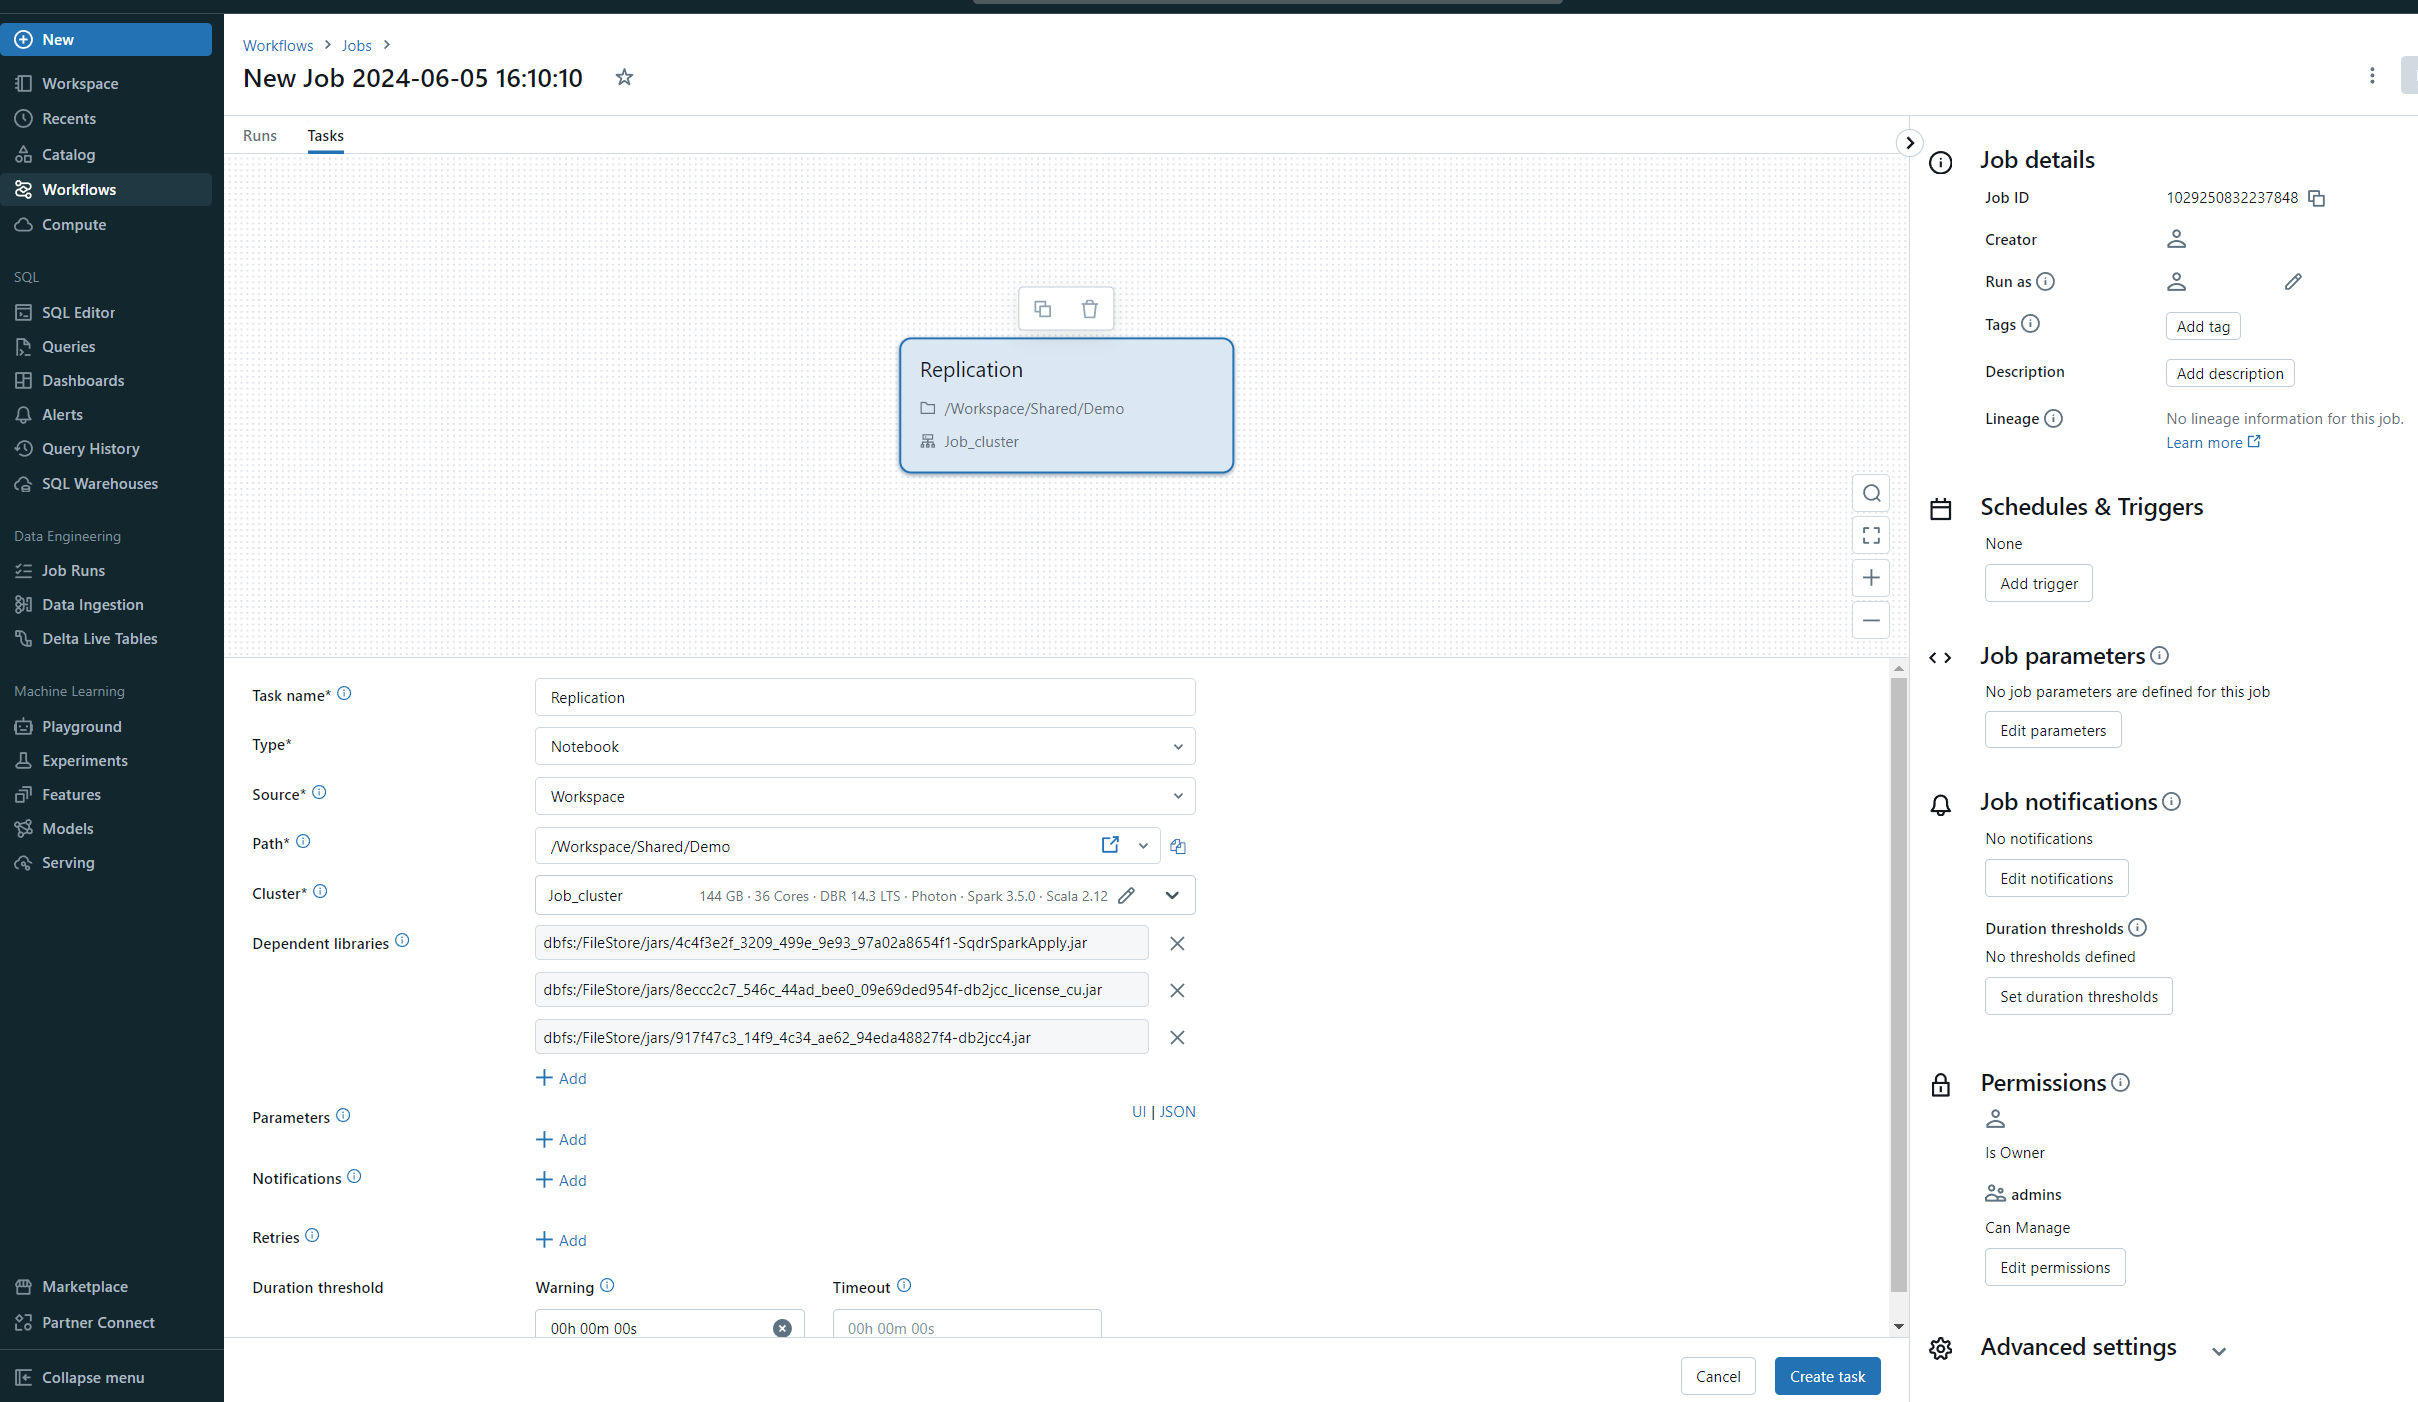
Creating an SQDR destination using the Simba ODBC driver
If you are interesting replicating only incremental change data to Databricks, using the Simba ODBC driver is optional; instead you can use any destination e.g. the SQDRC control database as a place-holder destination.
However, installing and configuring the Simba ODBC driver to communicate with Databricks can also handle creation of the destination tables. In addition, you can use the driver to replicate the baseline, though running the baseline through the Sink Connector is recommended.
Installing the Simba Spark ODBC driver
- Download the Simba Spark ODBC driver (aka Databricks ODBC driver) from Databricks.
- Install the driver
Obtain connection information from the Databricks workspace
- Generate a token (to be used in place of a password):
- Select your userID in the upper right corner.
- Select User Settings.
- Go to the Access Tokens tab.
- Select the Generate New Token button. Be sure to save the token, as there is no way to recover it other than generating a new token.
- Obtain the connection string:
- Select Compute icon in the sidebar.
- Select your cluster.
- Select Advanced Options.
- Select the JDBC/ODBC tab.
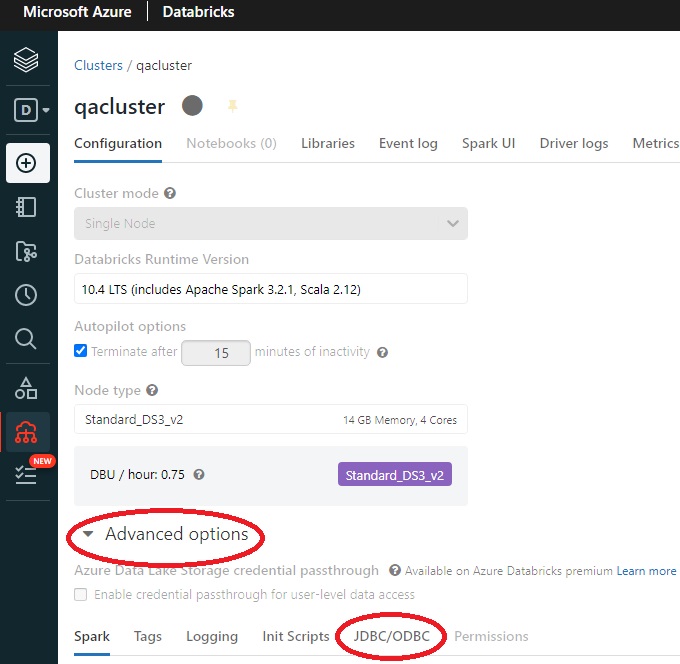
Copy the JDBC connection string and modify it as described below, or use this sed script to convert the JDBC connection string into an ODBC connection.
Starting with the JDBC connection string obtained from Databricks:
Example:
jdbc:spark://adb-nnnnn.0.azuredatabricks.net:443/default; transportMode=http;
ssl=1;httpPath=sql/protocolv1/o/555548385517300/0555-075538-pmvjaabc;AuthMech=3;
UID=token;PWD=<personal-access-token>
- Remove the UID & PWD parameters
- Convert the JDBC URL to host, port and database parameters, changing
jdbc:spark://<hostname>:443/default
to
host=<hostname>;Port=443;Database=default
- Change
transportMode=http
to
ThriftTransport=2
resulting in an ODBC connection string that can be used in Data Replicator Manager:
host=adb-nnnnn.azuredatabricks.net; Port=443;Database=default;ThriftTransport=2; ssl=1;httpPath=555548385517300/0555-075538-pmvjaabc;AuthMech=3
Create a destination in Data Replicator Manager
Create a destination in Data Replicator Manager, paste in the connection string as above, specify the name token as the user, and provide the token generated above as the password.
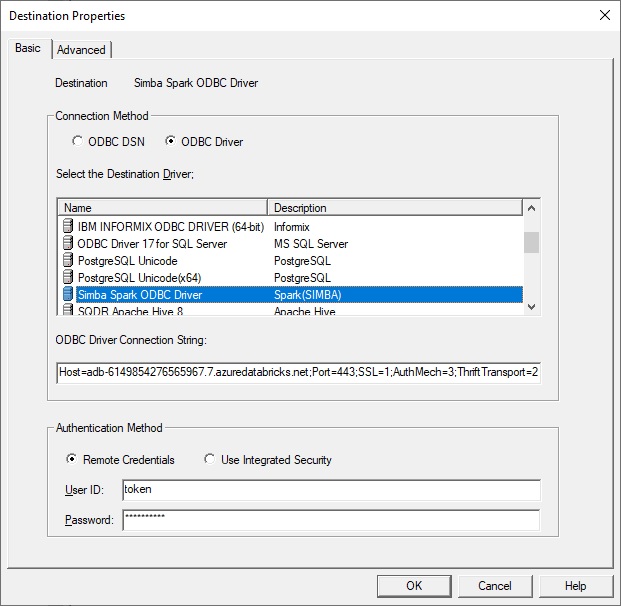
If you prefer to use an ODBC data source, extract the parameters from the connection string or from the JDBC/ODBC display and specify:
- Host adb-895148384217555.0.azuredatabricks.net
- Port 443
- Mechanism: select User Name and Password from the dropdown
- ThriftTransport: select HTTP from the dropdown
- Next choose the SSL button and select the Enable
SSL checkbox
- Select HTTP Options and enter HTTPPath: sql/protocolv1/o/895558384217300/0520-210341-dvybvgij
- Database default or a schema that you have created (or it can be left
blank)
On the Advanced panel of the Destination, change the default schema on the Advanced panel from token to the name of an existing Databricks schema.
Select the checkbox Stream(Using Apply extensions), and optionally specify a
directive for to be appended to the Create Table e.g.
USING DELTA LOCATION '/FileStore/tables/^f'
Specify ^~d instead of ^f if you do not want quotes around the table name. Select the Help button to see the options for this parameter.
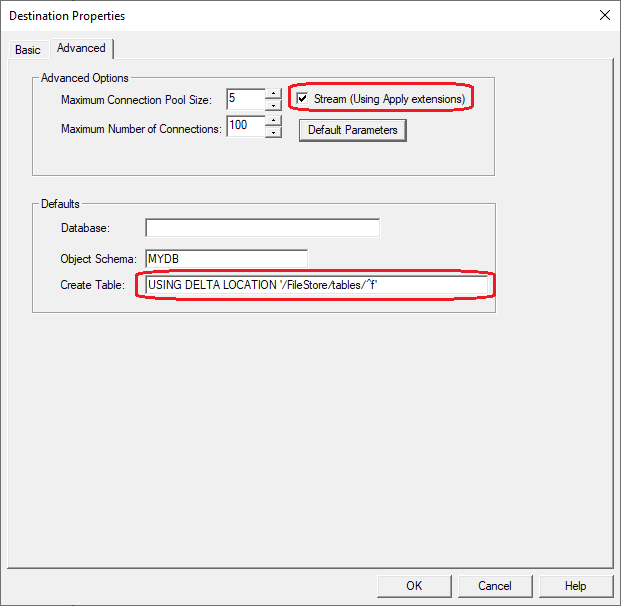
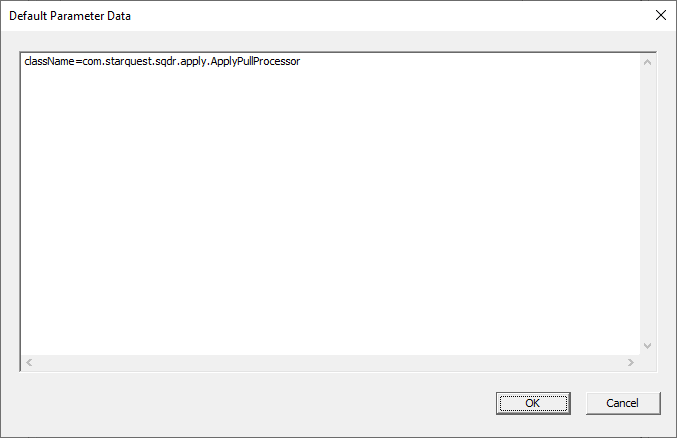
Select the Default Parameters and enter the string className=com.starquest.sqdr.apply.ApplyPullProcessor as shown below
Configuring the SQDR Incremental Group
Create the I/R group
Select the Parameters option of the Advanced dialog of the incremental group
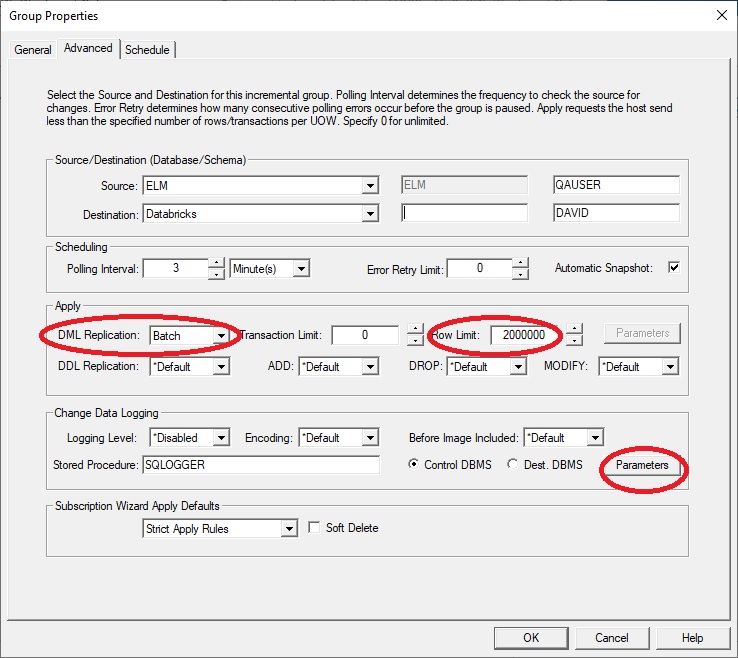
and enter the following string:
className=com.starquest.sqdr.apply.ApplyPullProcessor
We recommend increasing the Row Limit to a much larger number e.g. 2 million, and verify that the DML Replication type is Batch.
Creating a Subscription
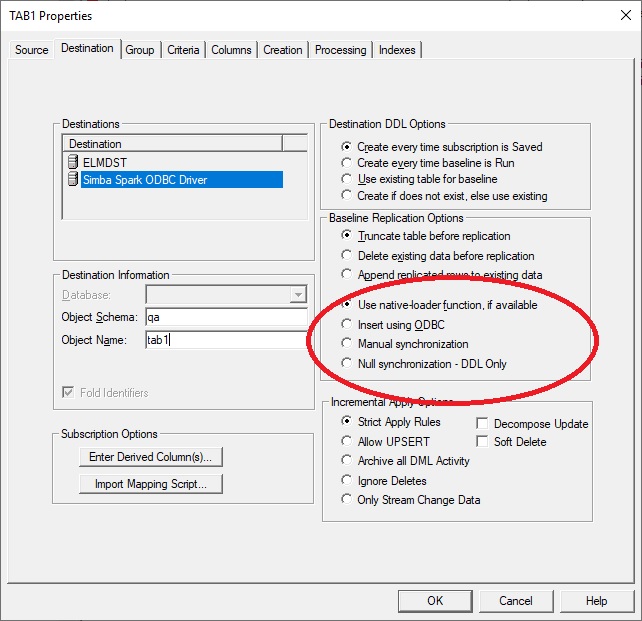
If the goal is incremental change data only, then configure the destination panel of the subscription specifying Baseline Replication Options to Append replicated rows to existing data and Null synchronization - DDL only as shown here. The destination panel should be configure as Insert using ODBC.
If you want baselines to be performed using the Sink Connector, specify Baseline Replication Options as Truncate or Append replicated rows (as desired) and Use native-loader function.
When creating subscriptions, we recommend using lower case for destination table names.
After creating the subscriptions, if Automatic Snapshot (on the advanced panel of the group) is enabled (default), the group is run automatically after creating the subscriptions. Otherwise, enable capture & apply.by running the subscriptions or the group.
Agent Parameters
Though the setup/configuration for this feature is typically done in Data Replicator Manager (Tier 3) or Databricks (Tier 4) as described in this tech doc, there are some advanced agent properties (maxStagedRows, maxStagedBlob, maxStagedClob, stableKeys) that can be used to adjust the behavior of the agent. See the Configuration Reference topic (under Reference and Troubleshooting) of the SQDR Plus help for details.
Spark Connector Status
In SQDR Plus version 6.30 or later, a new status object has been added to the Summary view of the agent to show the current state of the Scala notebook. An example of the Spark connector status object can be seen below:

See the following below for more information on each of the states of the Spark connector status:
- Starting - Shows when the notebook has started to run
- Active - The notebook is currently running and updates the timestamp of the Spark connector status
every time the connector polls for new work.
Note: If the Databricks cluster crashes, the connector status will not change and will continue to show Active with the last updated timestamp unless the notebook has been re-run after the Databricks cluster comes back up.
- Failed - Shows when the notebook has encountered a failure
- Stopped - Shows when the Scala notebook has been stopped
Reference
Description of the parameters used in the ApplyJdbc.run and ApplyJdbc.apply methods.Parameters
- destinationName
- Required
- This is the name of the Databricks destination from the Data Replicator Manager.
- jdbcUsername
- Required
- The value of this username is always sqdr.
- jdbcPassword
- Required
- The password of the sqdr user on Windows (or Linux)
- jdbcHostname
- Required
- The DNS or IP address of the Stelo Replicator.
- jdbcPort
- Optional for ApplyJdbc.apply
- The value is normally port 50000. Change this value if the Scala notebook is attempting to connect to the Stelo Replicator behind a gateway.
- jdbcDatabase
- Optional for ApplyJdbc.apply
- Default - SQDRC
- The name of the Tier 02 staging database where data will be replicated from.
- controlDbSchema
- Optional
- Default - SQDR
- name
- Optional
- Default - Databricks if ApplyJdbc.run is used to run the notebook
- Default - The Destination name if ApplyJdbc.apply is used to run the notebook
- Use this parameter to change the name of the Spark connector that appears in the Spark connector status.
- exitOnError
- Optional
- Default - false
- Set to true if the desired behavior for the notebook is to exit upon encountering an error.
- unity
- Optional
- Default - false
- Set to true if using Unity Catalog (3 part naming).
- catalogFilter
- Optional
- Default - null
- Set to the name of a schema to limit traffic to a specific schema. Requires the use of unity.
- useAppend
- Default - true
- incrementalThreads
- Optional
- Default - 20 if using ApplyJdbc.run
- Default - 10 if using ApplyJdbc.apply
- Tuning this values can lower the resource utilization and avoid a garbage collection issue when the notebook is run on compute clusters with fewer resources
- snapshotThreads
- Optional
- Default - 20 if using ApplyJdbc.run
- Default - 10 if using ApplyJdbc.apply
- Tuning this values can lower the resource utilization and avoid a garbage collection issue when the notebook is run on compute clusters with fewer resources
- continuousOperation
- Optional
- Default - true
- Set to false to configure the Scala job to terminate after 5 minutes of activity. This is useful if the Scala job is launched on a scheduled basis - e.g. once a day - to pick up the changes that have accumulated since the previous run to avoid incurring non-trivial charges and to optimize the MERGE operations.
- As of version 6.30, setting the parameter to false in the apply method will allow the Scala notebook to terminate.
SSL/TLS Connectivity from Databricks to Tier 2 Db2 LUW staging database
To connect to the Tier 2 Db2 LUW staging database over a secure connection, modify the Scala code, using the port defined for Db2 or StarPipes SSL communcations and adding the property extraJdbcProperties e.g.:
val jdbcSSLPort = 50448
ApplyJdbc.apply(spark, destinationName, jdbcUsername, jdbcPassword, jdbcHostname, jdbcSSLPort,
continuousOperation = true, useAppend=true, unity=false, exitOnError = false, extraJdbcProperties =
"sslConnection=true;")
If you are using a private Certificate Authority, you will also need to supply the CA certificate to Databricks. Use a Databricks init script to create the file /usr/local/share/ca-certificates/myca.crt and reference that file with extraJdbcProperties e.g.
val jdbcSSLPort = 50448
ApplyJdbc.apply(spark, destinationName, jdbcUsername, jdbcPassword, jdbcHostname, jdbcSSLPort,
continuousOperation = true, useAppend=true, unity=false, exitOnError = false, extraJdbcProperties =
"sslConnection=true;sslCertLocation=/usr/local/share/ca-certificates/myca.crt;")
See How to import a custom CA certificate and What are init scripts? for details. Note that only the first part of the sample script (creating the .crt file) is needed for our use case e.g.
#!/bin/bash
cat << 'EOF' > /usr/local/share/ca-certificates/myca.crt
-----BEGIN CERTIFICATE-----
<contents of CA certificate>
-----END CERTIFICATE-----
EOF
Troubleshooting
Issue:
When creating a subscription with the Simba Spark ODBC driver, you receive a warning that the destination table does not exist, even when it does.
Solution:
Table names in Databricks/Spark are typically lower case. Instruct SQDR to use lower case by unchecking
Fold Identifiers on the Destination panel of the subscription and confirming
that the destination table name is lower case.
Issue:
The Scala job fails to connect to the staging database with the error
Error opening socket to server {1} on port {2} with message: {3}. ERRORCODE=-4296, SQLSTATE=08001
Solution:
This indicates that the connection has been rejected. Verify that Db2 LUW on the Tier 2 system is listening on the port and IP address specified and that connectivity from Databricks is not being blocked by a firewall or an inactive VPN.
Here are some methods of testing connectivity from Databricks to Db2 LUW on the Tier 2 system:
- Ping: %sh ping host . Note that this may not work if your gateway or Tier 2 system does not respond to pings.
- Check for DNS resolution issues with %sh nslookup host
- Verify connectivity to the Db2 port (e.g. 50000)
%sh telnet host port
or
%sh nc -zv host port - Paste the testjdbc.py python script into a notebook, modify values (e.g. host, port, etc) and run it.
Issue:
Creating a new subscription fails with the error:
Service interface SQLQualifiers failed. ODBC message: SQLSTATE HY000, native error 35, [Simba][Hardy] (35) Error from server: error code: '0' error message: 'Error operating GET_CATALOGS [RequestId=8b3897c6-76c5-443b-8f48-8a47336ada4b ErrorClass=FEATURE_DISABLED] Unity Catalog is not available for feature tier STANDARD_TIER.'.
Solution:
Either confirm that the unity parameter is set to false (default) or upgrade the pricing tier of the Databricks workspace to Premium.
Hints & FAQ
Derived Columns
When using com.starquest.sqdr.apply.ApplyPullProcessor (the subject of this technical document) we recommend using an Expression (the upper left field of the Derived Column dialog) that is acceptable for Db2 LUW.
In the typical scenario of handling both baselines and incremental changes though Tier2, all derived columns are processed in the Db2 LUW staging database rather than at the Source.
Specifying different expressions in the Expression field (source database) and Staging Expression field (Db2 LUW staging database) is only applicable when baselines are obtained directly from the Source by Tier 3 i.e. when the Destination panel of the subscription specifies Insert Using ODBC rather than Use Native Loader Function.
DISCLAIMER
The information in technical documents comes without any warranty or applicability for a specific purpose. The author(s) or distributor(s) will not accept responsibility for any damage incurred directly or indirectly through use of the information contained in these documents. The instructions may need to be modified to be appropriate for the hardware and software that has been installed and configured within a particular organization. The information in technical documents should be considered only as an example and may include information from various sources, including IBM, Microsoft, and other organizations.