StarQuest Technical Documents
Installing Db2 LUW
Last Update: 4 January 2022
Product: SQDR & SQDR Plus
Version: 5.22 and later
Article ID: SQV00PL066
Abstract
In the four tier StarQuest Data Replication architecture, SQDR Plus runs on Tier 2 and uses a local IBM Db2 for Linux, UNIX & Windows (Db2 LUW) database as the control and staging database for each Staging Agent.
Tier 3 (Data Replicator Manager and Apply functionality) can use either Db2 LUW or Microsoft SQL Server for its control database. In a combined tier scenario, a local Db2 LUW database SQDRC (created by the SQDR Plus installer) is typically used. In a split tier environment, a local copy of SQL Server is typically used, though other options such a local Db2 LUW database or a remote Db2 or SQL Server database are possible.
This document describes installing Db2 LUW, with an emphasis on a Windows environment. Installing on Linux is similar.
Solution
Before installing Db2, plan what user account will be used to run the Db2 services. In most cases, this will be a local user e.g. db2admin (Windows) or db2inst1 (Linux). However, if you will be running the SQDR Plus services using a domain user rather than the default of Local System Account (for instance, when accessing a SQL Server source database using Windows authentication), then the Db2 services must also use a domain account (e.g. mydomain\db2admin); that account should be a local Administrator, and should be created by the domain admistrator before installing Db2.
Perform the following steps to install Db2 on Windows; installation on Linux is similar:
- (Windows only) Verify that the drive where you intend to install Db2 has 8.3 naming enabled - see the 8.3 naming discussion in Tips for the SQDR Plus Db2 LUW Staging Database for details. We have found that 8.3 naming is typically enabled for the system drive (C:), but disabled for any additional drives.
- Extract the contents of the compressed archive (e.g. v11.5.5_ntx64_server_dec.exe) downloaded from StarQuest
- Run Setup.exe
- From the Setup Launchpad, select Install a Product
- Under Db2 Server Editions, select the Install New button
- Accept the license agreement and select Next
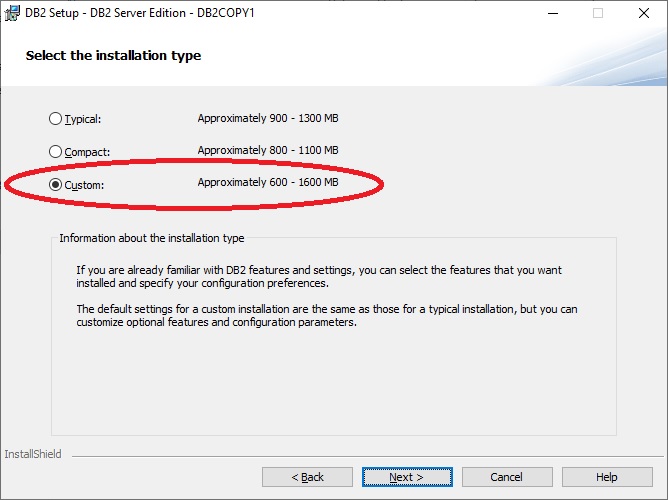
- For Installation Type, select Custom
- Click Next through several screens, accepting the default settings. If desired, you can choose to install the Db2 software in a location other than the default.
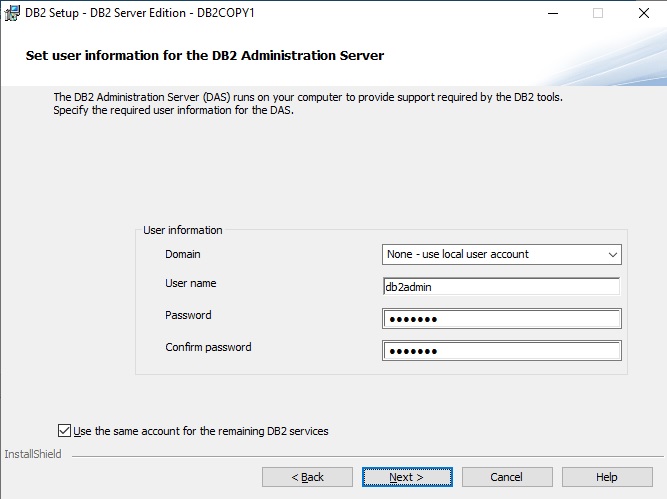
- On the screen Set user information for the Db2 Administration Server, either
- Enter a password for the local user db2admin (Windows) or db2inst1 (Linux) to be created by the installer; this password should meet the password policy requirements of your operating system.
- OR - if you will be using domain accounts for Db2 and SQDR Plus services (e.g. for SQL Server Windows authentication), enter the credentials for an existing domain user e.g. mydomain\db2admin; that user should be a member of the local Administrators group. If the installing user is not a domain administrator, you will get the expected warning The domain ID and password cannot be verified because domain administrator privileges are required. Be sure you have entered the correct credentials and continue the installation.
- Leave the checkbox Use the same account for the remaining Db2 services enabled.
- Click Next through several screens.
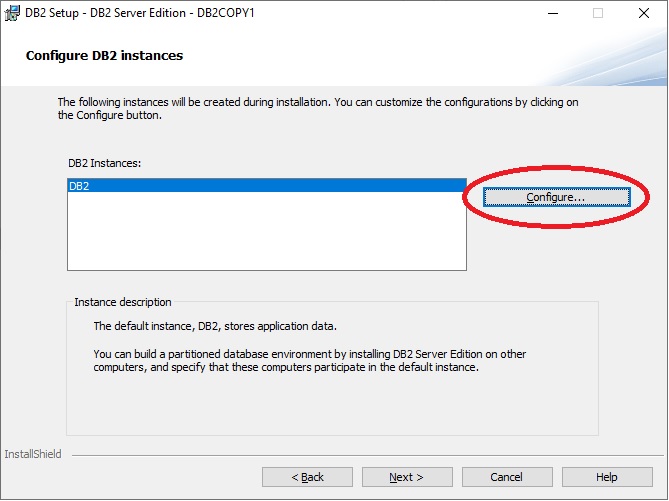
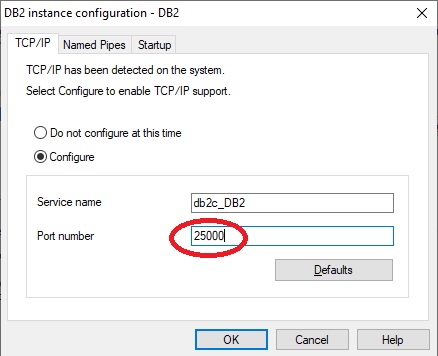
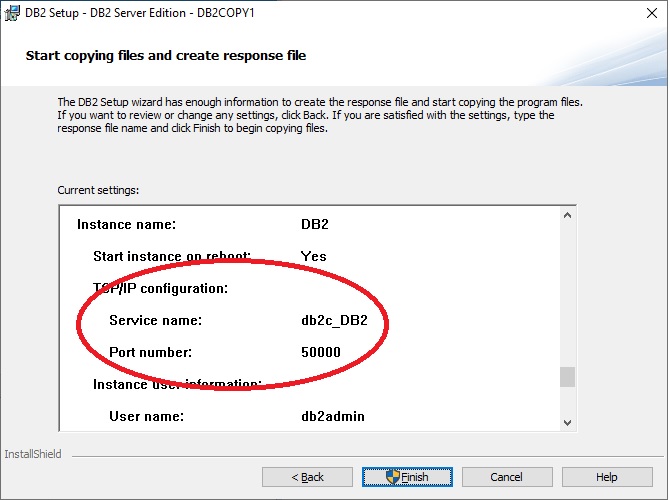
- On the Configure DB2 Instances panel, click the Configure... button and verify that the TCP/IP Port number is 50000. If you are installing Db2 LUW 11.5.6 and later as a new install, this value will be 25000 and should be changed to 50000. If the value differs because another product is using port 50000 or a previous installation of Db2 was not completely removed, examine the etc/services file to investigate and address the port conflict.
- On Set up notifications, set up a notification SMTP server if desired.
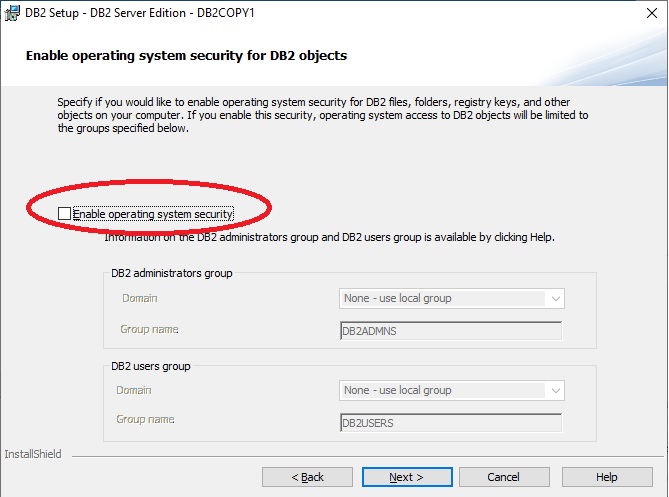
- On Enable operating system security for Db2 objects, unselect the checkbox Enable operating system security.
- On the final screen, verify the port number and Click Finish
If you need to change the port after installation, edit C:\Windows\System32\drivers\etc\services (/etc/services on Linux), change the value of db2c_DB2, and restart Db2.
You can now return to the installation of SQDR Plus (Tier 2) or configuration of SQDR (Tier 3).
DISCLAIMER
The information in technical documents comes without any warranty or applicability for a specific purpose. The author(s) or distributor(s) will not accept responsibility for any damage incurred directly or indirectly through use of the information contained in these documents. The instructions may need to be modified to be appropriate for the hardware and software that has been installed and configured within a particular organization. The information in technical documents should be considered only as an example and may include information from various sources, including IBM, Microsoft, and other organizations.

