
Stelo Technical Documents
Db2 Archive Logging & Online Backups of Control Databases
Last Update: 2024/07/26
Product: SQDR Plus and SQDR
Version: All
Article ID: SQV00PL085
Objective
SQDR Plus and SQDR uses Db2 LUW for its control and staging databases. In a standard deployment, those databases are configured for circular logging, which is easy to set up and maintain. The technical document Backing up the DB2 control database describes the process for offline backup of Db2 databases, which is the only option for databases configured for circular logging. However, offline backups requires shutting down the SQDR services to ensure there are no active connections.
To enhance recovery options in the case of unexpected hardware or software failures, some or all of the databases can be configured for archive logging. This also allows online backups to be performed without disruption of SQDR services.
Even without performing a full backup, the presence of archive logs can be used to recover to a point in time in the case of an unexpected failure involving the loss of an active log.
Note that using archive logging and running scheduled backups will consume additional disk resources; care must be taken that older logs and backups are purged to avoid a disk full condition, using either a scheduled task or Db2 automated maintenance.
Table of contents
- Requirements
- Considerations
- Enable Archive Logging
- Configure Automatic Backups
- Configure Manual Backups
- References
Requirements
- The databases to be backed up must be configured for archive logging rather than circular logging.
- The user running the backup procedure must have sufficient permissions in the Db2 instance to run the BACKUP command (SYSADM, SYSCTRL, or SYSMAINT) and write access to the target directory.
Considerations
- To reduce the size of the backups, users can perform a Db2 REORG which will reclaim disk space by eliminating fragmented data. For more information on how to perform a REORG and reduce the size of the tablespace, please refer to Db2 LUW Staging Database - Storage Maintenance.
- Note that online backups are larger than offline backups, as they contain all the log files necessary to roll forward to the end of backup (i.e. transaction log files that were written to while the backup was being taken).
- Determine where to store the archive logs. We recommend storing the archive logs on drive other than the active logs (e.g. V):. You may want to use a network drive.
- Determine where to store the backup images. We recommend storing the backups on a separate drive (e.g. W:). For additional protection, using a network drive will ensure they are available in the case of the SQDR system becoming unavailable. Ensure that there is enough space in the disk where the backups will be created.
- If you are using manual backups, you may choose to use the INCREMENTAL option with or without the DELTA option. Note that automated cleanup of recovery objects (logs, backup images, etc) only occurs after a full backup.
Enable Archive Logging
- Stop the SQDR services.
- Use db2 list application to confirm that there are no active connections.
- Configure the database for archive logging
e.g.
mkdir V:\db2archivedir
db2 update db cfg for database using LOGARCHMETH1 DISK:V:\db2archivedir
db2 backup db database to NUL:
Or you can use the PowerShell script db2_archivelog.ps1.
- Restart the SQDR Services.
Even without a full backup, archive logs can be used to recover to a point in time in the event of a failure causing the loss of an active log. If the goal is to enable archive logging but not configure backups, edit db2clean.ps1 and create a scheduled task (a Windows scheduled task or a Linux crontab entry) to invoke it to clean up older archive logs to avoid filling the disk. You may skip the rest of this article.
Configure Automatic Backup
- Create the destination directory e.g. mkdir W:\backups
- From a Db2 command window, execute the following for each database to be backed up. NUM_DB_BACKUPS indicates the number of full backups to retain; REC_HIS_RETENTN specifies the number of days that historical information on backups is retained.
db2 UPDATE DATABASE CONFIGURATION for database USING auto_maint ON
db2 UPDATE DATABASE CONFIGURATION for database USING auto_db_backup ON
db2 UPDATE DATABASE CONFIGURATION for database USING AUTO_DEL_REC_OBJ ON
db2 UPDATE DATABASE CONFIGURATION for database USING NUM_DB_BACKUPS 2
db2 UPDATE DATABASE CONFIGURATION for database USING REC_HIS_RETENTN 14
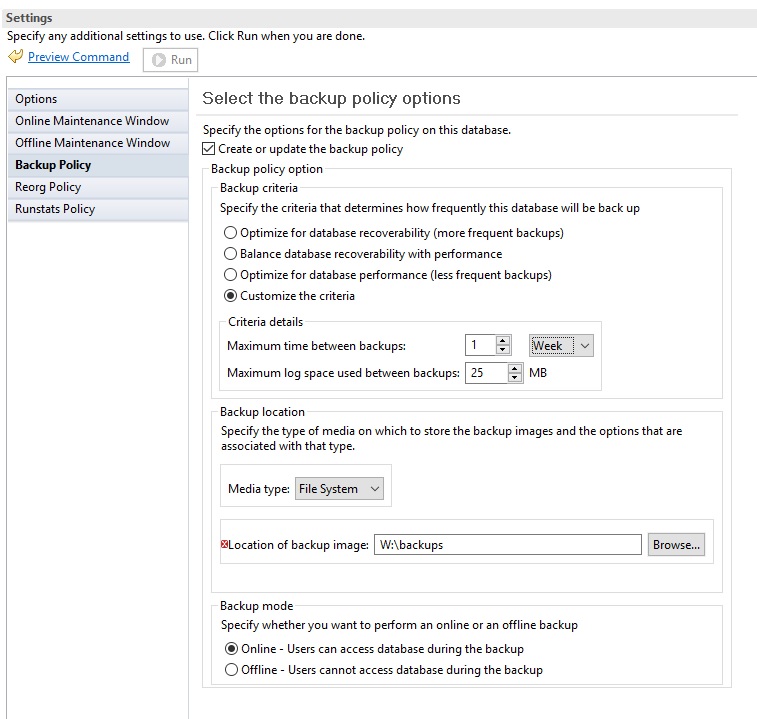
- Connect to the database and issue the following SQL to specify Online backups, performed every 168 hours (one week), with a destination of W:\backups.
CONNECT TO database;
CALL SYSPROC.AUTOMAINT_SET_POLICY ( 'AUTO_BACKUP', BLOB('<?xml version="1.0" encoding="UTF-8"?><DB2AutoBackupPolicy xmlns="http://www.ibm.com/xmlns/prod/db2/autonomic/config"><BackupOptions mode="Online"><BackupTarget><DiskBackupTarget><PathName>W:\backups</PathName></DiskBackupTarget></BackupTarget></BackupOptions><BackupCriteria numberOfFullBackups="1" timeSinceLastBackup="168" logSpaceConsumedSinceLastBackup="6400"/></DB2AutoBackupPolicy> ') );
CONNECT RESET;
You may need to deactivate a database for the new values to take affect.
Alternatively, you can either
- Copy the contents of the sample file SQLLIB/samples/automaintcfg/DB2DefaultAutoBackupPolicy.xml, modify the XML to satisfy your configuration requirements, and supply the XML file to the AUTOMAINT_SET_POLICY procedure . Comments in this file explain the parameters.
- or use Data Studio to configure the Backup Policy:
- Connect to the database
- Right-click on the database name and select Setup and Configure, then Configure Automatic Maintenance.
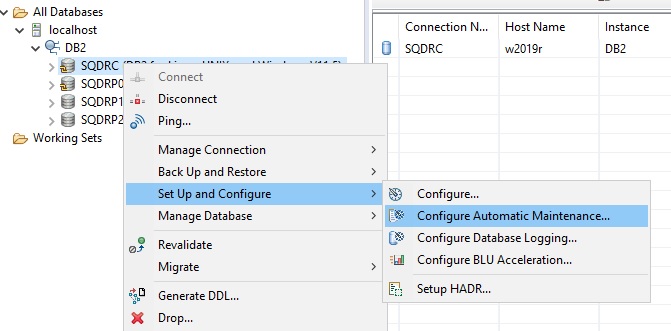
- Select Backup Policy
- Select the checkbox for Create or Update backup policy.
- Modify the parameters as desired.
- If you encounter an error when saving the policy, you can choose Preview Command and copy and paste the command and invoke it as above.
Configure Manual Backup
- Create a backup destination e.g. mkdir W:\backups
- Modify this PowerShell script db2_backup.ps1 as desired. Note a Windows network drive should be referenced as \\server\mount-point\directory rather than as a drive letter.
- Create a scheduled task to invoke it. The script should be run as a user that has write access to the destination.
- Cleanup older recovery objects (archive logs, backup images, etc) either by editing db2clean.ps1 and creating a scheduled task to invoke it OR configure backup retention/automated cleanup with the following commands:
db2 UPDATE DATABASE CONFIGURATION for database USING AUTO_DEL_REC_OBJ ON
db2 UPDATE DATABASE CONFIGURATION for database USING NUM_DB_BACKUPS 2
db2 UPDATE DATABASE CONFIGURATION for database USING REC_HIS_RETENTN 14
The database manager automatically updates and prunes recovery history file entries after a full database backup operation. If auto_del_rec_obj is ON, the database manager will delete the corresponding physical log files, backup images, and load copy images when it prunes the history file.
References
IBM documentation:
DISCLAIMER
The information in technical documents comes without any warranty or applicability for a specific purpose. The author(s) or distributor(s) will not accept responsibility for any damage incurred directly or indirectly through use of the information contained in these documents. The instructions may need to be modified to be appropriate for the hardware and software that has been installed and configured within a particular organization. The information in technical documents should be considered only as an example and may include information from various sources, including IBM, Microsoft, and other organizations.