
StarQuest Technical Documents
How to Use StarSQL in a SQL Server 2005/2008/2012 SSIS Package
Last Update: 14 March 2012
Product: StarSQL
Version: 5.x
Article ID: SQV00SQ011
Abstract
This document describes how to create a SQL Server 2005/2008/2008R2/2012 Integration Services (SSIS) package to import or export DB2 data using a StarSQL data source.
Solution
The following sections guide you through the creation of a SSIS package using either the SQL Server Import and Export Wizard (dtswizard.exe) or the SQL Server Business Intelligence Development Studio.
StarSQL (64-bit) users should review the StarQuest Technical Document Considerations for using StarSQL (64-bit) with SQL Server 2005/2008/2012.
Import DB2 Data into SQL Server
Export SQL Server data to DB2
Using the SSIS Package
Additional Information
Troubleshooting
To Import DB2 Data
SQL Server 2005, SQL Server 2008 (2008sp2, 2008R2, and later), SQL Server 2012SQL Server 2008 (earlier than sp1)
SQL Server 2005 SQL Server 2008 (2008sp2, 2008R2 and later), or SQL Server 2012
- Start the SQL Server Import/Export Wizard by either
- Invoking the shortcut "Import and Export Data (32-bit)" or "Import and Export Data (64-bit)" from the SQL Server program group.
- Or Start the Microsoft SQL Server Management Studio, right-click the SQL Server database that you want to import data into, select Tasks, and choose Import Data (this will be the 32-bit version)
- Or Invoke dtswizard.exe (the choice of 32-bit or 64-bit is dependent on the PATH)
- On the Welcome dialog, click Next.
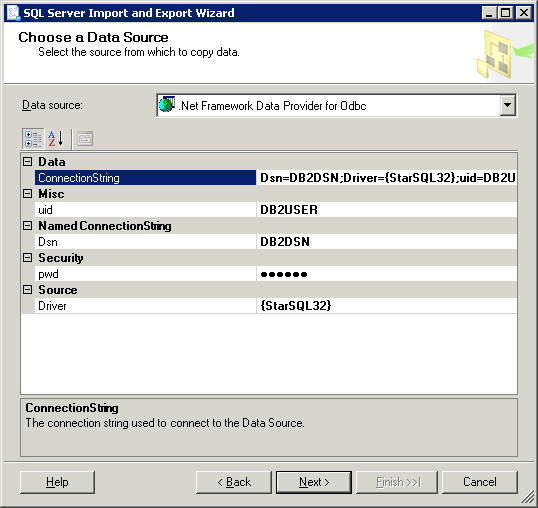
- When you are prompted to choose a Data source, select .Net Framework Data Provider for Odbc.
- In the Dsn field, enter the name of the StarSQL System DSN you wish to use.
- You do not need to enter anything In the Driver field.
- Press the Tab key to generate the ConnectionString value.
- Edit the ConnectionString value to add a valid DB2 user ID and password
using the parameters uid and pwd, respectively, and press Tab. The finished
ConnectionString should look similar to the following:
Dsn=DB2PROD;uid=DB2USER;pwd=SECRET
- Click Next. If the connection is successful, the wizard resumes. If an error occurs, review the settings and try again.
- The wizard allows you to run the package immediately and/or save it to a file or to a local or remote SQL Server database. The saved package can later be edited or executed using other applications.
SQL Server 2008 (prior to sp2)
- Start the Microsoft SQL Server Import and Export Wizard by either:
- Select "Import and Export Data (32-bit)" or "Import and Export Data (64-bit)" from the Microsoft SQL Server 2008 or 2008R2 program group. OR
- Start the Microsoft SQL Server Management Studio, right-click the SQL Server database that you want to import data into, select Tasks, and choose Import Data. This invokes the 32-bit version of the wizard.
NOTE: StarSQL (64-bit) users should execute the 64-bit wizard, see StarQuest Technical Document Considerations for using StarSQL (64-bit) with SQL Server 2005/2008/2012 for more information.
- On the Welcome dialog, click Next.
- When you are prompted to choose a Data source, select .Net Framework Data Provider for Odbc.
- In the Dsn field, enter the name of the StarSQL System DSN you wish to use.
- You do not need to enter anything In the Driver field.
-
If the "Choose a Data Source" dialog appears similar to the dialog pictured above (with the ability to edit the ConnectionString value), add a valid DB2 user ID and password using the parameters uid and pwd and enter Tab.
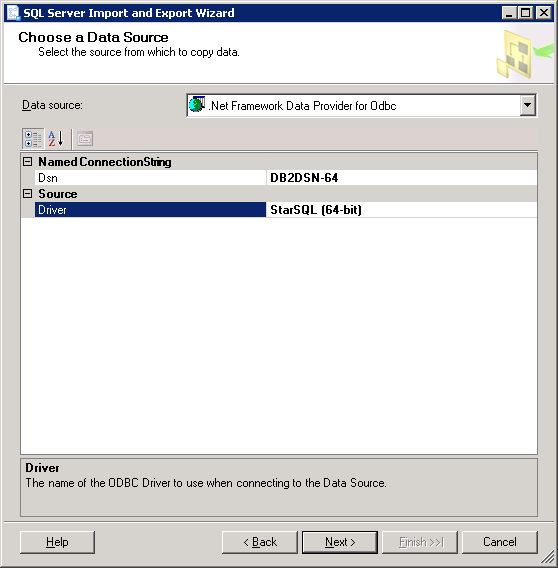
-
Otherwise, if the dialog looks similar to the following (without the ability to add the User ID and Password), you will need to configure the StarSQL DSN with both the User ID and Password. Refer to the StarQuest Technical Document How to Automate StarSQL Logins for instructions.
- Click Next. If the connection is successful, the wizard resumes. If an error occurs, review the settings and try again.
- The wizard allows you to run the package immediately and/or save it to a file or to a local or remote SQL Server database. The saved package can later be edited or executed using other applications.
To Export Data into DB2
Some versions of SQL Server 2005/2008 Integration Services (SSIS) do not include a built-in component that can write data to an ODBC destination. If Method 1: Using SQL Server Import and Export Wizard does not provide the needed functionality, use Method 2: Using SQL Server Business Intelligence Development Studio to write a custom script and include it in the SSIS package as a destination component.
Method 1: Using SQL Server Import and Export Wizard
- Start the Microsoft SQL Server Import and Export Wizard (32-bit or 64-bit as appropriate for the version of StarSQL) as documented above.
- On the "Choose a Data Source" dialog for the source from which to copy, Data Source should be an appropriate SQL Server provider (e.g. SQL Server Native Client 10.0). Confirm that Server name, Authentication, and Database are correct.
- Click Next
- On the "Choose a Destination" dialog, select .Net Framework Data Provider for Odbc.
- Configure the DSN, Driver, and Connection String as documented above.
- Click Next.
Method 2: Using SQL Server Business Intelligence Development Studio
Create an SSIS Package and Configure a Connection Manager for the Source Database
- Launch the SQL Server Business Intelligence Development Studio.
- From the File menu, select New --> Project --> Integration Services Connections Project Wizard.
- Specify a project name, location, and select the Create new Solution option. Click OK to start the project wizard.
- On the Welcome dialog, click Next.
- Choose the Data Provider to be used for a connection to the Source database and click Add.
- In the Connection Manager dialog, configure the connection and verify connectivity using the Test Connection button on the same dialog. Click OK to return to the project wizard.
- Verify that the newly created connection is listed under the Configured Connection Managers and click Next.
- Check the Source box and click Next. Click Finish to create the project.
- In the Package.dtsx [Design] tab, click Data Flow to open the Data Flow view.
- Right-click the Source component and select Edit.
- Select the Data Access Mode and specify the table/view name or the SQL statement to execute.
- Choose the columns to include in the data transformation process and set the error handling as desired. Click OK when finished configuring the Source properties.
- Leave the Package.dtsx [Design] tab open while you complete the next steps.
Create a Data Connection for the Destination DB2 Database
- In the Connections Manager window (below the Design window), right-click in the window and select New Connection.
- In the Add SSIS Connection Manager dialog, choose ODBC (ODBC Connection manager for ODBC connections) as the Connection manager type and click Add.
- Click the New button to create a new Data connection.
- In the Data source specification section, select the StarSQL user or system data source from the drop down list and enter in a valid DB2 userID and password combination. In SQL Server 2008, the wizard does not appear to retain the password. It is therefore necessary to configure the StarSQL DSN with both the User ID and Password. Refer to the StarQuest Technical Document How to Automate StarSQL Logins for instructions.
- Verify that the connection works properly using the Test Connection button. Click OK to create the connection manager and click OK once again to save the connection manager.
- In the Package.dtsx [Design] tab, click Data Flow to open the Data Flow view.
- From the toolbox, locate the Script Component under Data Flow Transformations. Click on it and drag it to the Data Flow view. When prompted to select the Script Component Type, choose Destination and click OK.
- In the Data Flow view, connect the Source to the Script Component by dragging the green arrow from the Source until it touches the Script Component box.
- Right-click the Script Component and select Edit. Select the Script Language under Custom Properties and set the other properties on this panel as desired.
- Under Input Columns, select the columns from the source table that contain data you want to write to DB2.
- On the Connection Managers panel, add a new connection manager. For the name of the connection, do not use any spaces or special characters. An example of a valid name is "DB2PROD". You will use this name in the custom script. Specify the Connection Manager (the one created in the previous step) and provide an optional description. Click OK.
- Under the Script panel, click the Edit Script button. Write a custom script that loads data from the Source into DB2. For a sample script, refer to the SQL Server 2005/2008 Books Online topic Creating an ODBC Destination with the Script Component.
- After the script has been created, save the package. Test the package by right-clicking it under the Solutions Explorer and choosing Execute Package.
Using the SSIS Package
After creating a package with the Import/Export wizard and saving it to either the file system or a local or remote SQL Server database, you can use the package in the following ways:
Business Intelligence Development Studio (BIDS): a GUI design environment based on Visual Studio. This allows you to view, modify, and debug packages.
- Start BIDS from the shortcut in the SQL Server program group.
- Select File/New Project.. from the File menu and create a new Integration Services Project (under Business Intelligence Projects)
- Expand the project in the Object Explorer.
- Under SSIS packages, delete the automatically created package "package.dtsx"
- Right click SSIS packages and select "Add Existing Package"
Execute Package Utility (GUI) : When you select Execute Package Utility from the Integration Services program group of SQL Server, the 32-bit GUI application dtexecui.exe is invoked. It is also invoked when you use SQL Server Management Studio to connect to Integration Services of a local or remote SQL Server database. You can view the packages that are stored in the SQL Server database by expanding Stored Packages/MSDB. If you right click on a package and select "Execute", then dtexecui.exe is run on the local machine. In this scenario, the remote SQL Server database is being used only as a storage location for the packages.
dtexec.exe (command line): The command line version of dtexec.exe is supplied as both 32-bit and 64-bit versions ( in C:\Program Files (x86)\Microsoft SQL Server\100\DTS\Binn and C:\Program Files\Microsoft SQL Server\100\DTS\Binn).
To display the version (including bit width), execute dtexec without any parameters:
C:\> dtexec
Microsoft (R) SQL Server Execute Package Utility
Version 10.50.1600.1 for 64-bit
To execute a package stored on the file system with verbose reporting:
C:\> dtexec /f C:\temp\package.dtsx /REP V
To run a package stored in a SQL Server database:
C:\> dtexec /DTS "\MSDB\package" /SERVER servername /REP V
To modify the connection string during execution - for instance, if you need to supply the user and password during execution rather than using the values stored in the package:
C:\> dtexec /f bgreports.dtsx /rep v /Conn SourceConnectionAdoNET;"\"DSN=myDSN;UID=myuser;PWD=secret\""
To supply a DSN-less connection string during execution:
C:\> dtexec /f "package.dtsx" /CONNECTION SourceConnectionAdoNET;"\"Driver={StarSQL (64)};uid=myuser;pwd=secret;characterSubstitution=Silent;SERVER=MYRDB;HostName=myhost;Port=446;Netlib=SWTCP32.DLL;PkgColId=STARSQL\"" /REP V
SQL Server Agent: Specify a job step type of SQL Server Integration Services Package when configuring a SQL Server Agent job. The job will invoke the dtexec utility.
See the StarQuest Technical Document Considerations for using StarSQL (64-bit) with SQL Server 2005/2008 for additional information.
Additional Information
- If your package specifies a connection using DSN=, then it will be portable to both 32-bit and 64-bit environments, as long as an ODBC data source by the appropriate name and bit width exists on the target system.
- If your package specifies a connection using a DSN-less connection string, then it can be deployed to other machines without having to configure ODBC data sources on all the target machines. However, it will be either 32-bit or 64-bit specific, as part of the connection string contains either Driver={StarSQL 32} or Driver={StarSQL (64)}.
Troubleshooting
- Certain data (such as a nullable VARCHAR column containing no data) may cause the symptoms described in the Microsoft Knowledge Base article KB969845 FIX: Error message when you run a SQL Server 2005, SQL Server 2008, or SQL Server 2008 R2 Integration Services package (SSIS) after you install the .NET Framework 2.0 SP2 or the .NET Framework 3.5 SP1: "ADO NET Source [1424]", A typical error message for this condition is:
[ADO NET Source [1424]] Error: SSIS Error Code DTS_E_INDUCEDTRANSFORMFAILUREONERROR. The "component "ADO NET Source" (1424)" failed because error code 0x80131937 occurred, and the error row disposition on "output column "columnname" (Number)" specifies failure on error.
Or
Error 0xc0209029: Data Flow Task 1: SSIS Error Code
DTS_E_INDUCEDTRANSFORMFAILUREONERROR. The "component "Source - tablename "
(1)" failed because error code 0x80131937 occurred, and the error row
disposition on "output column "columnname" (22)" specifies failure on error.
(SQL Server Import and Export Wizard)Solution: Be sure you are using StarSQL 5.59 or later.
- A similar error may appear due to the warning that StarSQL issues when it performs character substitution.For example, if a CHAR column contains the character such as 0x1A; StarSQL converts the character to a question mark and issues a SQL_SUCCESS_WITH_INFO return code, causing SSIS to issue the above error related to the Source.
Solution: Set the expert setting CharacterSubstitution=Silent in the StarSQL ODBC data source or in the ConnectionString.
- Data type Mapping: You may need to modify the default data type mappings selected by the Import and Export Wizard. For instance, DB2 TIMESTAMP columns are mapped to smalldatetime, and a valid TIMESTAMP value outside the more limited range of smalldatetime will cause the following error:
Error 0xc0202009: Data Flow Task 1: SSIS Error Code DTS_E_OLEDBERROR. An
OLE DB error has occurred. Error code: 0x80004005.
An OLE DB record is available. Source: "Microsoft SQL Server Native Client
10.0" Hresult: 0x80004005 Description: "Invalid date format".Error 0xc020901c: Data Flow Task 1: There was an error with input column
"columnname" (187) on input "Destination Input" (119). The column status
returned was: "Conversion failed because the data value overflowed the
specified type.".Solution:
- On the "Select Source Tables and Views" dialog, select the checkbox next to the table and select Edit Mappings...
- On the "Column Mappings" subdialog, change the destination column type from the dropdown selection, or select Edit SQL... and modify the CREATE TABLE SQL statement.
- Identifying Problem Rows: if you receive data-specific output conversion errors at the destination (i.e. the error occurs only for certain rows) such as the "Invalid date format" error above, edit the SSIS package in Business Intelligence Development Studio and modify the Destination to redirect error rows to another destination (e.g. a flat file or a database file on the source system).
- If you store password information in a package and then modify the package in BIDS or modify the StarSQL connection string in dtexecui.exe, you may receive the following error, which indicates that the password information has been lost:
System.Data.Odbc.OdbcException: ERROR [08004]
[StarSQL][StarSQL ODBC Driver]Some connection parameters are missing for Data Source.
Solution: enter the password again by editing the StarSQL Connection Manager object in BIDS, or by appending PWD=secret to the connection string in dtexecui.exe.
- If you store a package containing an encrypted password to the file system, and attempt to execute the package on another system, you may receive the following errors:
Failed to decrypt protected XML node "DTS:Password" with error 0x8009000B "Key not valid for use in specified state.". You may not be authorized to access this information. This error occurs when there is a cryptographic error. Verify that the correct key is available.
System.Data.Odbc.OdbcException: ERROR [08004]
[StarSQL][StarSQL ODBC Driver]Some connection parameters are missing for Data Source.
Solution: Save the package to a SQL Server database and specify Package protection level as "Rely on server storage and roles for access control".
DISCLAIMER
The information in technical documents comes without any warranty or applicability for a specific purpose. The author(s) or distributor(s) will not accept responsibility for any damage incurred directly or indirectly through use of the information contained in these documents. The instructions may need to be modified to be appropriate for the hardware and software that has been installed and configured within a particular organization. The information in technical documents should be considered only as an example and may include information from various sources, including IBM, Microsoft, and other organizations.