
StarQuest Technical Documents
SQDR: Using CSV files and PowerShell to ADLSg2
Last Update: 5 December 2021
Product: StarQuest Data Replicator
Version: v6.10 and later
Article ID: SQV00DR047
Abstract
A frequent request from customers is how to use SQDR to populate Azure Data Lake Storage Gen2 (ADLSg2) and similar NoSQL data repositories. As there is no ODBC driver for such repositories, SQDR cannot be used directly. However, SQDR can coupled with other technologies such as Kafka and PowerShell to achieve the desired goals.
One method is to use the SQDR Kafka Producer to send data in either JSON or XML format through a Kafka server. In the case of Azure destinations, Azure Event Hubs (a Kafka-compatible ingestion service), a simple configuration choice (Features/Capture) provides a method of storing data in an Azure Storage Account.
This technical document describes another technique using CSV files, PowerShell, and the Windows Task Scheduler.
Solution
- Overview
- Prerequisites
- Using the Scripts
- Create a Scheduled Task
- Troubleshooting
- Configuring SQDR
- Suggestions for Improvements
- Error Handling
- References
Overview
Download sqdr_azure.zip, which contains the PowerShell example scripts to perform the following task:
- Pause an incremental replication (I/R) destination that writes to CSV files
- Copy CSV files to an intermediate directory
- Clear the contents of the active CSV files
- Resume the I/R group
- For each non-empty CSV file in the intermediate directory:
- Rename the file to <table><timestamp>.CSV.
- Copy the CSV file to Azure Data Lake Storage Gen2.
- If there is a problem copying to ADLSg2, move the file to a holding directory.
- Rename the file to <table><timestamp>.CSV.
The zip file contains the following files:
- parms.ps1 - first edit this file to customize parameters for your environment.
Customization information is documented as comments. - setup_azure.ps1 - this should be run once to verify connectivity and to create the Azure container and directory if desired. The directory can also be autocreated when you start uploading CSV files, or it can be created in advance by the Azure administrator.
- sqdr_azure.ps1 - this script should tested (run it from an elevated PowerShell command window for foreground testing), and then deployed as a Windows scheduled task.
- sqdr_azure.cmd - Customize and run this as a scheduled task. This handles the creation of log files.
PREREQUISITES
- PowerShell version 5.1 or higher.
This is included as part of Windows Server 2016 and later. If you are using Windows Server 2012r2, you can download PowerShell 5.1 from Microsoft.
The following command displays the version of PowerShell
echo $PSVersionTable.PSVersion.ToString()
- .NET Framework is 4.7.2 or greater installed.
Windows Server 2019 & 2022 already meet this requirement; for Windows Server 2016 & earlier, you can download it from Microsoft.
The latest version is 4.8 (recommended), and we recommend running Windows Update after installing to get the latest cumulative update.
To determine the installed version of .NET Framework, examine the registry at
HKEY_LOCAL_MACHINE\SOFTWARE\Microsoft\NET Framework Setup\NDP\v4\Full
Or use the PowerShell command:
Get-ItemProperty "HKLM:\SOFTWARE\Microsoft\NET Framework Setup\NDP\v4\Full"
Version : 4.7.03062 is 4.7.2
- Install the Az.Storage module from an elevated PowerScript command window:
Install-Module Az.Storage -Repository PSGallery -Force
On Windows 2016, you may need to issue these commands first:
- Ensure we are using TLS 1.2 using the command
[Net.ServicePointManager]::SecurityProtocol = [Net.ServicePointManager]::SecurityProtocol -bor [Net.SecurityProtocolType]::Tls12
- Install NuGet first:
Install-PackageProvider -Name NuGet -Force - Finally install the Az.Storage module
Install-Module Az.Storage -Repository PSGallery -Force
- An Azure subscription.
- A storage account that has hierarchical namespace enabled.
- The following Azure information is needed:
- storage_account name
- storage account key
- Name of the Container and directory that you wish to use - this can be created by the setup_azure script (assuming you have authority to do so).
Using the Scripts
- Expand the zip file into a directory e.g. C:\Scripts
- Edit the accompanying parms.ps1 e.g. Azure credentials and destination information, file locations of the active CSV files and the transfer folder, name of the I/R group or destination, etc.
- Also edit the DIR property within the sqdr_azure.ps1 script if you are using a directory other than C:\Scripts.
- If you expand the zip file into C:\scripts, the following directories are created, matching the pre-configured values in parms.ps1. Otherwise, create the directories as desired and edit parms.ps1.
- C:\scripts\Transfer - this is the SrcDirectory, where SQDR is writing the CSV files
- C:\scripts\Staging - this is the WorkDir - intermediate directory where CSV files are renamed and filtered as desired, prior to uploading to ADLSg2
- C:\scripts\Holding - this is the holdDir - the directory to save CSV files that were not successfully uploaded to Azure Storage
- To run sqdr_azure.ps1, from a command window for testing purposes, start PowerShell as Administrator; this is needed to have the authority to run the commands to pause and resume the I/R group.
- However, for production, create a scheduled task ran at a set interval e.g. hourly.
Create a scheduled task
For Actions, choose Start a program, enter powershell for the program/script, and enter -F C:\scripts\sqdr_azure.ps1 for the arguments.
Or (recommended) use sqdr_azure.cmd to redirect output to a log file.
- If desired, edit sqdr_azure.cmd to customize the name and location of the log file.
- From Administrative Tools, select Task Scheduler.
- Right-click on Task Scheduler Library and select Create Task
- Name the task e.g. sqdr_azure
- Use Change User or Group... to specify the user account to run the task. Typically you will use SYSTEM (Local system account).
- Select Run whether user is logged on or not
- On the Actions tab, select New... and browse to the location of sqdr_azure.cmd
- On the Triggers tab, select New... and configure when to run the task.
You should also add a nightly or weekly scheduled task to clean up the log files.
Troubleshooting
- If you get an error Powershell script not digitally signed, unblock the PS1 file.
- If you get an authority error when the script is pausing the incremental destination or group, verify that you are running from an elevated PowerShell command window (logged on as a user with local admin rights), or that the scheduled task is running as such a user - we recommend using SYSTEM for the scheduled task.
Configure SQDR
Using Data Replicator Manager:
- Create the CSV destination using the "SQDR Text" ODBC driver using an ODBC connection string or an ODBC data source.
Here is a sample connection string:
Database=C:\Scripts\Transfer;TableType=Character;Delimiter=|;DataFileExtension=CSV;FirstLineNames=1
If you do not specify FirstLineNames=1, set $FirstLineNames="0" in parms.ps1
AllowUpdateAndDelete=1 is not needed if the I/R group (or all subscriptions) is configured for Archive All DML Activity. However, it is needed if you want saving the subscription to recreate the CSV file (e.g. to add columns)
Database=C:\Scripts\Transfer;AllowUpdateAndDelete=1;TableType=Character;Delimiter=|;DataFileExtension=CSV;FirstLineNames=1
- Create an I/R group. On the Advanced panel, set Subscription Wizard Defaults to Archive all DML Activity
- Create the subs using Insert Member under the I/R group/Members
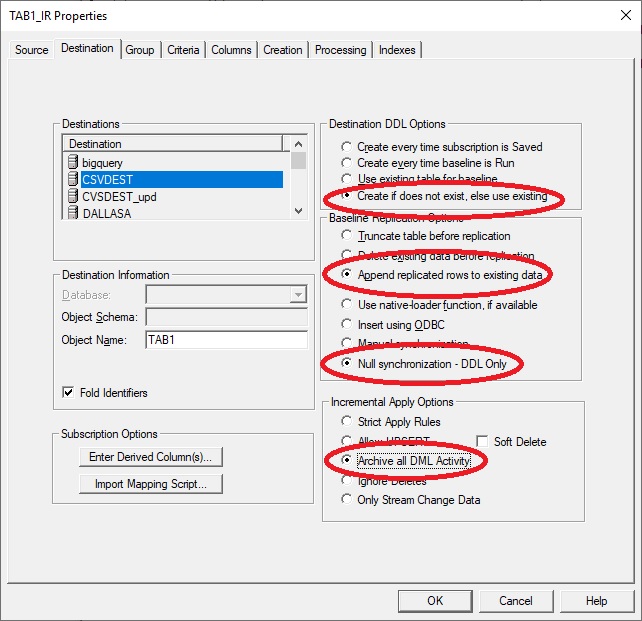
- On the Destination panel:
- The Destination DDL Options on the Destination panel should be set to
Create (table) if does not exist; else use existing - Baseline Replication Options should be
Append replicated rows to existing data - If you only want incremental changes and not baselines, then set
Null synchronization - DDL only
- On the Columns panel , add desired derived columns e.g.
@TYPE VARCHAR(1)
@TX VARCHAR(20)
@SEQ VARCHAR(20)
Note that these columns will be blank for a baseline (so they should be nullable); they only have values for incremental changes.
Suggestions for Improvements
- Azure Authorization: the script illustrates using a storage account key for authorization. See the Microsoft documentation for New-AzStorageContext for other options such as Azure Active Directory.
- Filtering on the files (if desired).
- Handle a marker table indicating end of day processing.
- Improve error checking. This is especially important for the operation writing to Azure, since if that fails, we have no recovery if we don't save a copy of the file. See Error Handling for the current state of error handling.
- Designing for long running jobs:
If there is a possibility that the script may take a while to run - i.e. if another invocation of the script may occur before the current run completes and you may have more than one invocation of the script running at the same time, then the name of the working directory should be something unique like a timestamp with hour. Note that additional cleanup will be necessary to delete that directory once the script completes. You should also create multiple Azure transfer log files and handle cleanup for those log files.
Error Handling
Here is the current state of error handling:
- If you supply an incorrect name for the storage account, the script appears to hangs forever. There may be some way to specify a timeout.
- If you supply incorrect credentials for the storage account, you get this error:
New-AzDataLakeGen2Item : Server failed to authenticate the request. Make sure the value of Authorization header is formed correctly including the signature.
HTTP Status Code: 403 - HTTP Error Message: Server failed to authenticate the request. Make sure the value of Authorization header is formed correctly including the signature.
ErrorCode: AuthenticationFailed - If the container does not exist, you get this error
New-AzDataLakeGen2Item : The specified container does not exist. HTTP Status Code: 404 - HTTP Error Message: The specified container does not exist.
ErrorCode: ContainerNotFound - If the directory does not already exists, it is automatically created if you are authorized to do so.
- If the destination file already exists, it is overwritten. This situation seems unlikely since we are appending a timestamp (including milliseconds) to the filename.
- Removing the -force option will cause this message when run as a foreground job; if invoked as a scheduled task - it may hang forever.
Are you sure to overwrite 'https://adlsg2sq.blob.core.windows.net/sqdr/sqdrdirx/x.ps1'?
[Y] Yes [N] No [S] Suspend [?] Help (default is "Y"):
References
- Use PowerShell to manage directories and files in Azure Data Lake Storage Gen2
- Introduction to Azure Data Lake Storage Gen2
- Azure Data Engineering: Azure Blob Storage vs. Azure Data Lake Storage Gen2
DISCLAIMER
The information in technical documents comes without any warranty or applicability for a specific purpose. The author(s) or distributor(s) will not accept responsibility for any damage incurred directly or indirectly through use of the information contained in these documents. The instructions may need to be modified to be appropriate for the hardware and software that has been installed and configured within a particular organization. The information in technical documents should be considered only as an example and may include information from various sources, including IBM, Microsoft, and other organizations.