
StarQuest Technical Documents
Quick Start Guide to Using SQDR Plus on Windows with MySQL (Part 1)
Last Update: 13 April 2021
Product: SQDR Plus
Version: 4.9 or later
Article ID: SQV00PU006-WMySQL
Abstract
This document describes preparing the source database system and installing and configuring the SQDR Plus Platform. After completing the tasks in this document, continue with the appropriate version of Quick Start Guide to Using SQDR Plus (Part 2), which describes installing, configuring, and running SQDR.
We recommend printing out this worksheet and filling in the values as directed by the instructions below.
This document is intended for first-time users of SQDR and SQDR Plus. Users who are upgrading an existing installation should refer to the SQDR Release Notes or SQDR Plus Release Notes for upgrade instructions.
If you encounter any problems while using the evaluation software, please open a support ticket with Stelo Customer Support at https://support.stelodata.com or call +1 415.669.9619 for assistance.
The estimated time to complete all tasks is approximately 2 hours.
SQDR Plus Prerequisites:
- Tier 1 Source Computer Requirements and Preparation
- Tier 2 SQDR Plus Platform Requirements
- Tier 3 SQDR Platform Requirements
- Tier 4 Destination Requirements
Installation and Configuration Tasks:
- Download and Install the SQDR Plus Software
- Connect to the SQDR Control Center
- Add the Source Database with the SQDR Control Center
- Verify SQDR Plus Installation using SQDR Control Center
SQDR Plus Overview
The Stelo Data Replicator solution consists of several software components, and involves up to four systems, all loosely connected via TCP/IP. Figure 1 illustrates the four tiers. In some cases, multiple tiers may be running on the same physical server; for instance, Tier 2 (SQDR Plus), Tier 3 (SQDR Platform) and Tier 4 (Destination DBMS) may all be installed on the same Windows system. This document covers topics related to Tiers 1 and 2.
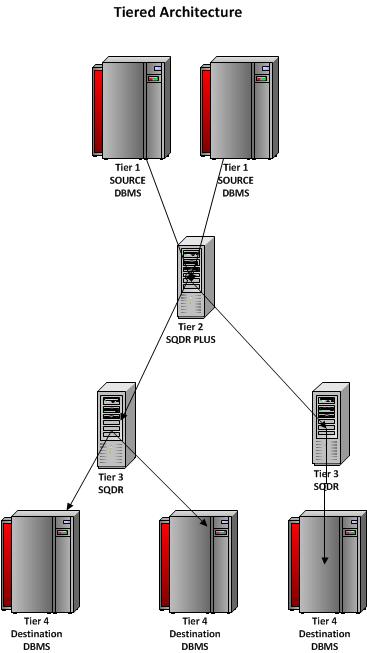
Figure 1: SQDR Plus Architecture
Tier 1: Source Database System
The source system contains the data to be replicated and may be running one of the following:
- IBM DB2 for i
- IBM DB2 for Linux, Unix, Windows (DB2 for LUW)
- Microsoft SQL Server
- Oracle
- IBM Informix
- MySQL, MariaDB, or AWS Aurora
- PostgreSQL
Tier 2: SQDR Plus Platform
This system may be running either Windows or Linux. A local control database (IBM DB2 for LUW) is used for staging transactions; when a change is made on the source system, the data is stored here temporarily until it has been retrieved by the SQDR clients and applied to the destination database.
Three Java-based services are installed on this system:
- SQDR Plus Derby service - the Apache Derby database is used as a control database for the SQDR Plus Launch Agent.
- SQDR Plus Jetty service - the SQDR Control Center web application, running under the Apache Jetty WebServer
- SQDR Plus Launch Agent service - the primary SQDR Plus service. The initial process is called the Launch Agent and is used to configure and launch Staging Agents for each configured source system.
The SQDR Plus installer includes a JRE (Java Runtime Environment) for running the three services.
The SQDR Plus platform can be configured and managed from any system using a browser and the SQDR Control Center web application.
Tier 3: SQDR Platform
The SQDR service is installed on a Windows or Linux system. The SQDR installation includes the Data Replicator Manager application (running on a Windows system) for configuring and managing the replications and the StarSQL ODBC driver for connecting to DB2 systems (including the SQDR Plus staging database). The SQDR service uses a local or remote DB2 LUW or Microsoft SQL Server database for its control database. Using a local DB2 LUW database is recommended, especially for the typical scenario where both tiers 2 and 3 reside on the same system. The SQDR installer is included in the SQDR Plus installer for Windows for simplified installation in the typical combined tier2/tier3 scenario.
SQDR on Linux is typically deployed as a Docker container, though it is also available as a set of RPM files.
Tier 4: Destination DBMS
No software is installed on this platform, but it must be accessible from the SQDR Platform.
SQDR Plus Prerequisites
We recommend printing out this worksheet and filling in the values as directed by the instructions below.
The same individual or a combination of individuals must be capable of performing in the following roles in order to successfully complete the evaluation.
- Tier 1 Database Administrator is someone with administrative authority on the source system.
- Tier 2 Administrator is someone with administrative authority to install SQDR Plus and a local DB2 LUW database on a Windows or Linux computer.
- Tier 3 Administrator is someone with administrative authority to install SQDR and either DB2 LUW or SQL Server database on a Windows or Linux computer. This may be the same role as Tier 2 Administrator in a typical combined tier2/tier3 deployment.
- Tier 4 Database Administrator is someone with administrative authority on the destination system.
Tier 1 MySQL host computer requirements
- The source system must be running one of the following:
- MySQL (Community or Enterprise Edition) 5.6 or later
- MariaDB 10.x
- Amazon Web Services Aurora (MySQL-compatible)
- Amazon Relational Database Service (RDS) for MySQL or MariaDB
- Azure Database for MySQL or MariaDB
- Google Cloud SQL for MySQL
- Both the SQDR Plus Staging Agent and the SQDR client machine communicate with MySQL; be sure that the port being used by MySQL (typically 3306) is not blocked by firewalls.
- All subscribed tables must have primary keys or unique indexes.
- binary logging must be enabled, using ROW format.
- When using AWS Aurora or AWS RDS for MySQL, you may need to increase the binlog retention hours parameters to prevent premature deletion of the binlog files (i.e. before SQDR has finished scanning them). See the AWS documentations for mysql.rds_set_configuration for details.
- After enabling binary loggng, you may need to implement management of MySQL log files to prevent increased disk usage. See Managing MySQL Log Files.
- Prior to creating an agent, create a user (default SQDR) with authorities as outlined below.
- The database parameter log_bin_trust_function_creator should be set to 1/true/on when the new agent first connects to the control database in order to create functions (e.g. SQDR.SQTZ(), used by the @tz derived column feature). Once the functions have been created, the database parameter can be reverted to its original value. Changing this value does not require an instance restart.
The next section describes platform-specific tasks e.g. for enabling binary logging. After completing the tasks, continue on to the section on Creating the Agent User.
MySQL & MariaDB
AWS Aurora
AWS RDS for MySQL
Azure Database for MySQL
Google Cloud SQL for MySQL
Binary Logging & log_bin_trust_function_creator (MySQL & MariaDB)
To enable binary logging and set the format to ROW, add the following lines to the [mysqld] section of the configuration file - e.g. C:\ProgramData\MySQL\MySQL 5.7\my.ini (Windows), /etc/my.cnf (UNIX), or /etc/my.cnf.d/server.cnf (MariaDB on UNIX) and restart the MySQL service:
log-bin=/home/mysql/logbin
expire-logs-days=2
server-id=1
binlog_format=ROW
The path for binlog should be a location with a large amount of space. The specified path and file must be writable by the mysql user.
If you do not specify a full path (e.g log-bin=logbin), the logfiles will be created in a default directory. For example, on Windows they will be created in C:\ProgramData\MySQL\MySQL Server 5.7\Data.
Additional parameters like max_binlog_size, max_binlog_cache_size, sync_binlog are avaiilable for performance tuning.
Check the configuration file for the setting binlog-do-db, which is used to restrict binary logging to specified databases. If this property is used, the configuration must explicitly allow binary logging for both the source database and the agent database (SQDR). The binlog-do-db setting can be specified multiple times e.g.
binlog-do-db=MYDB
binlog-do-db=SQDR
Also check for the setting binlog-ignore-db, which excludes specific databases from binary logging.
To verify that binary logging is enabled, issue the following statements from the mysql command line environment or other ad-hoc mechanism (e.g. odbctest):
SELECT @@log_bin;
select @@binlog_format;
SHOW BINARY LOGS;
show variables like '%bin%';
To enable the agent to create functions and stored procedures in the control database during the initial connection, issue the following command as the ROOT user; it is not necessary to restart the database:
SET GLOBAL log_bin_trust_function_creators = 1;
After the agent has connected and created its function, you can revert the setting with:
SET GLOBAL log_bin_trust_function_creators = 0;
Binary Logging & log_bin_trust_function_creator (AWS Aurora)
To enable binary logging in Amazon Web Services Aurora:
- If you're using the default Aurora DB cluster parameter group, create a new DB cluster parameter group.
- In the Parameter Groups pane of the Amazon RDS console, select the DB custom cluster parameter group and choose Edit Parameters.
- Change the parameter binlog_format to ROW, and then choose Save Changes.
- If you created a new DB cluster parameter group in step 1, attach the parameter group to your DB cluster by selecting the cluster in the Clusters pane of the RDS console, choosing Modify Cluster, updating DB Cluster Parameter Group to the new DB cluster parameter group, and then choosing Apply Immediately.
- Reboot all the instances in the Aurora DB cluster
- Verify the settings as described in the previous section (SELECT @@binlog_format etc) .
For more information, see
How do I enable binary logging for my RDS instance running Aurora?
To enable the agent to create functions and stored procedures in the control database during the initial connection, edit the DB parameter group that you created for your Aurora instance(s) and temporarily set the log_bin_trust_function_creators parameter to true; it is not necessary to restart the database.
Binary Logging & log_bin_trust_function_creator (AWS RDS for MySQL)
To enable binary logging in Amazon Relational Database Service (RDS) for MySQL:
- In the Parameter Groups pane of the Amazon RDS console, choose Create Parameter group and select the appropriate values:
Parameter Group Family: as appropriate e.g. mysql5.7
Type: DB Parameter Group
Group Name: e.g. MySQL57-custom
Description: something descriptive
- Select Create.
- Select the new Parameter group and select Edit parameters.
- Change the parameter binlog_format from MIXED to ROW, and then choose Save Changes.
- Select the instance and choose Modify from Instance Actions.
- Under Database Options, select the new DB Parameter group from the dropdown.
- Select the Apply Immediately checkbox.
- Reboot the DB instance.
- Verify the settings as described in the previous section (SELECT @@binlog_format etc).
For more information, see the Binary Logging Format section in MySQL Database Log Files.
To enable the agent to create functions and stored procedures in the control database during the initial connection, edit the DB parameter group that you created for your MySQL instance(s) and temporarily set the log_bin_trust_function_creators parameter to true; it is not necessary to restart the database.
Binary Logging & log_bin_trust_function_creator (Azure Database for MySQL)
To enable the agent to create functions and stored procedures in the control database during the initial connection, set the parameter log_bin_trust_function_creators to ON (Portal > your Azure DB for MySQL Server> Server Parameters)
Binary Logging & log_bin_trust_function_creator (Google Cloud SQL for MySQL)
When creating a SQL instance, expand the Configuration options, and under Enable auto backups, verify that the checkbox Enable binary logging (for point-in-time recovery and replication) is enabled (this is the default setting).
If you are using an existing SQL instance, you can examine and change this setting in the Google Cloud Console by selecting Edit.
You can verify the settings as above (SELECT @@binlog_format etc).
To enable the agent to create functions and stored procedures in the control database during the initial connection, temporarily set the log_bin_trust_function_creators parameter to true, using either:
gcloud sql instances patch [INSTANCE_NAME] --database-flags log_bin_trust_function_creators=ON
OR
- In the Google Cloud Platform Console, open an existing project by selecting the project name.
- Open the instance and click Edit.
- Scroll down to the Flags section.
- To set a flag that has not been set on the instance before, click Add item, choose the flag from the drop-down menu, and set its value.
- Click Save to save your changes.
Agent User
The SQDR Plus agent communicates with the source system using a userID with the following authorities:
- Ability to create the control database and control tables
- Ability to read the binary logs
- Ability to verify the existence and read the subscribed tables
To create the Agent User, issue the following statements from the mysql command line environment (mysql -u root -p) or other ad-hoc mechanism (e.g. odbctest):
CREATE USER SQDR IDENTIFIED BY 'mypassword';
GRANT ALL ON SQDR.* TO SQDR ;GRANT SHOW DATABASES, REPLICATION SLAVE, REPLICATION CLIENT ON *.* TO SQDR
GRANT GRANT OPTION ON SQDR.* TO SQDR
GRANT SELECT, SHOW VIEW ON mydatabase.* TO SQDR
(where mydatabase contains the tables to be replicated)
When using a MySQL 8.0.x server configured for strong password encryption ( my.cnf/ini contains default_authentication_plugin=caching_sha2_password; this is the default on new installations of MySQL 8.0.x;), configure the Agent user to use legacy password authentication.
ALTER USER SQDR IDENTIFIED WITH mysql_native_password BY 'mypassword';
After creating the agent and before creating an SQDR source in Data Replicator Manager, use either the agent user (SQDR) or another user with sufficient authority (e.g. root) to grant read access to SQDR.SQ_PROPERTIES to the SQDR client user. Otherwise, SQDR will not know that MySQL is enabled for incremental replication - the checkbox and dropdown on the Advanced panel of Source setup in Data Replicator Manager will be greyed out.
GRANT SELECT ON SQDR.SQ_PROPERTIES TO SQDRUSER
Tier 2 SQDR Plus Platform requirements
- We recommend printing out this worksheet and filling in the values as directed by the instructions below.
- The SQDR Plus Platform requires TCP/IP access to the Tier 1 database host and from the Tier 3 Windows platform.
- Use Regedit to configure TCP KeepAlive Settings.
- Create the following Windows account and record its password:
- sqdr - SQDR client user. This account requires no special operating system authorities and can be either a local or a domain account, but we recommend using the name sqdr and its password must conform to the password complexity requirements of the Windows system. It is used for communication from the SQDR client platform and is the owner of the control tables and stored procedures stored in the SQDR Plus control database. You will be prompted for this user and password by the SQDR Control Center when creating a connection to the source database. We recommend configuring this user as "Password never expires" and uncheck "User must change password at next logon". To use a name other than "sqdr", see Tier 2 UserID Considerations.
- Verify that ports 8080, 8443, 50000, 50005, and some number of ports following 50005 (equal to the number of agents you plan to create) are not in use by another application. It is not uncommon for port 8080 to be used by a Java-based server such as tomcat or a RAID management tool:
- Enter netstat -an | findstr LISTENING | findstr :8080
- Open the Resource Monitor from the Performance tab of Task Manager and examine the Listening Ports displayed on the Network tab.
- If ports 8080 and 8443 are in use, choose different jetty listening ports during the installation of SQDR Plus.
- If port 50000 is in use, choose a different port when installing Db2. In addition, you will need to add the clientODBCString property to the configuration of all agents; see Configuration Reference in the Control Center Help.
- If port 50005 (and some number of following ports equal to the number of agents you plan to create) are not available, choose another port range and follow the instructions in Configuring Non-standard RMI Ports.
- Install Db2 LUW (Linux, UNIX & Windows) 11.5.5fp1 or later for use as a control database and temporary store for SQDR Plus. Db2 LUW is bundled with SQDR Plus.
- The Db2 installer will create an instance that starts automatically with the system. Examine the properties of the instance to determine the port number; the default port number is 50000.
- Plan the location of Db2 database files and logs; we recommend using high performance drives (e.g. SSD) and isolating the disk activity of Db2 database files and logs from other system activity. We recommend specifying those locations during installation of SQDR Plus.
- If a firewall is enabled, create inbound exceptions for the following TCP ports:
- SQDR Control Center port (jetty) - default 8080
- SQDR Control Center SSL port (jetty) - default 8443
- Db2 (SQDR Plus control database) port - default 50000
Tier 3 SQDR Platform requirements
See the Quick Start Guide to Using SQDR Plus (Part 2) for considerations for the Tier 3 Windows platform that will run SQDR.
Tier 4 Destination database requirements
- The destination DBMS must be accessible from the Tier 3 SQDR platform.
- If the destination is SQL Server, we recommend the following settings be applied on the destination database:
ALTER DATABASE [mydb] SET allow_snapshot_isolation ON
ALTER DATABASE [mydb] SET read_committed_snapshot ON
See Avoiding Locks for SQL Server Destination for details.
Summary of tasks
Perform the tasks in the order described, noting that some provide information used in subsequent steps. The detailed instructions for each task follow this summary.
- Request to download SQDR Plus.
- Receive the e-mail with a Registration Key and download links for StarAdmin, SQDR, and SQDR Plus.
- Print the SQDR Plus Worksheet and use it as a guide while following the instructions below.
- Tier 1 Database Administrator: verify pre-requisites on the host database.
- Tier 2 SQDR Plus Platform Administrator: Download SQDR Plus using the download link from step 2, complete the pre-installation tasks (including creating users and installing a local copy of Db2 11.x for use as the SQDR Plus control database), and install the software on the SQDR Plus server.
- Tier 1 SQDR Plus Platform Administrator or Tier 1 Database Administrator: Use a browser to connect to SQDR Control Center (SQDR Manager) to verify installation.
- Tier 1 Database Administrator: Use SQDR Control Center to configure a connection to the source database.
- Tier 1 Database Administrator or Tier 2 SQDR Plus Platform Administrator: Verify SQDR Plus installation and test Support functions using SQDR Control Center.
- Continue to Quick Start Guide to Using SQDR Plus (Part 2), which describes installing, configuring, and running SQDR on the Tier 3 platform.
Step 1: Request SQDR Plus Software
Estimated Time: 5 minutes
All software packages are distributed as compressed files that you download from the StarQuest Ventures Web site. From a web browser enter the address http://www.starquest.com/ and click on Download for Trial under the Products menu. Request to download SQDR Plus.
Step 2: Receive the Download Confirmation E-mail from StarQuest
Estimated Time: 5 minutes
After submitting a request to download SQDR Plus, you will receive an e-mail containing a Registration Key and download links for the SQDR Plus, StarAdmin, and SQDR software. The registration key will be used in step 4b in Part 2 to obtain temporary license keys valid for 15 days and the download links will be used below.
Step 3: Print the SQDR Plus Worksheet
Step 4: Verify prerequisites on the Tier 1 Source Database system
See Tier 1 host computer requirements above.
Step 5: (Tier 2 SQDR Plus Platform Administrator) Download and Install the SQDR Plus Software
Estimated Time: 10 minutes
- Verify the Tier 2 prerequisites: DB2 Workgroup for LUW 11.5.5 should be installed and running, firewall exceptions defined, and Windows user sqdr created.
- Using the link provided in the confirmation e-mail, download the SQDR Plus software. Right-click and select Properties of the zip file and unblock it if necessary. extract the .zip file in a temporary folder.
- Log on to the computer as a user with Administrator rights, and change to the directory where you extracted the installer.
- Execute setup.exe to launch the installer.
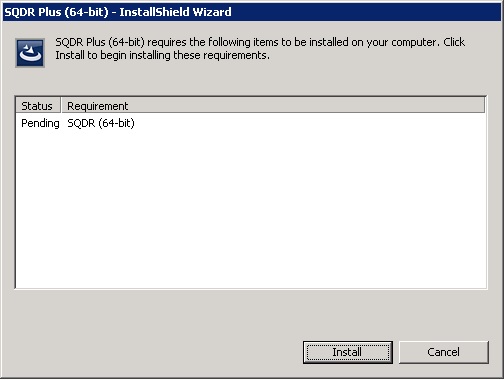
- The following dialog will appear; click Install whether or not you plan to install SQDR on this system.
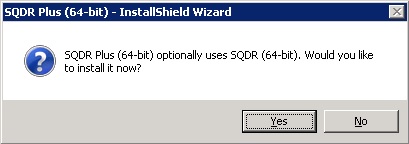
- The following dialog will appear; click Yes to install SQDR on this machine (typical combined tier 2 & 3 scenario).
- A progress dialog is displayed while SQDR is installed.
- On the Welcome dialog, click Next.
- Accept the License Agreement and click Next.
- The Service Parameters dialog will appear :
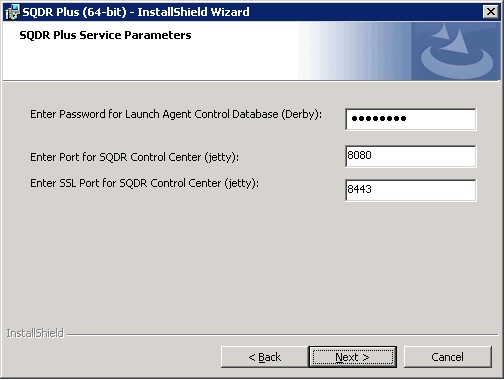
- Enter the following values and press Next:
- Password for Launch Agent Control Database (Derby): Enter a password that will be used for access to the Derby control database used by the Launch Agent. Do not supply a sensitive password, as this value is stored in a non-secure manner. You will be prompted for this password when connecting to SQDR Control Center.
- Port for SQDR Control Center (jetty): default 8080
- SSL Port for SQDR Control Center (jetty): default 8443
-
The DB2 Parameters dialog will appear; this allows you to specify the location of the database files and logs used by the local DB2 LUW staging database.
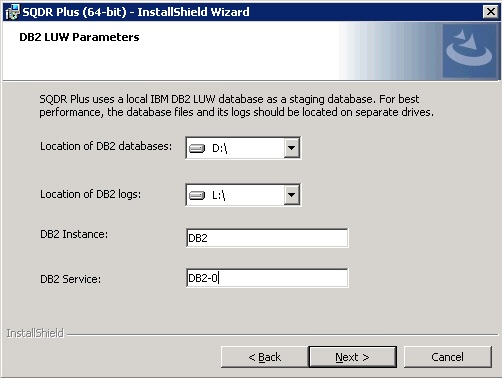
- Select the desired drive locations for DB2 database files and DB2 logs.
- The default value for DB2 Instance is obtained from the DB2INSTANCE environment variable. Change this value if you will be using a different DB2 instance for the staging databases (e.g. in a Windows cluster environment).
- The name of the DB2 service is displayed for informational purposes. The value may vary depending on the version and edition of DB2 being used, or if you are using a Windows clustered environment.
- Select Next.
- Accept to install SQDR Plus in the default directory of C:\Program Files\StarQuest\sqdrplus or browse to select an alternate directory. Click Next to continue.
- Accept to place SQDR Plus Program Data in the default location of C:\ProgramData\StarQuest or browse to select an alternate directory. Click Next to continue.
- Click Install to begin the installation or click the Back button to make any changes.
- A command window will appear briefly while the installer creates a DB2 database SQDRC for use as SQDR control database and updates DB2 database manager parameters. Review the results and and hit Enter to close the window when the operations complete.
- After the installation is complete, click Finish.
- Open the Services control panel and verify that all three SQDR Plus services are active.
Step 6: (Tier 2 SQDR Plus Platform Administrator or Tier 1 Database Administrator) Connect to the SQDR Control Center
The SQDR Control Center (formerly known as SQDR Manager) is a web-based application. For best results, we recommend using the Chrome web browser. If you are using Internet Explorer on a Windows Server system and Enhanced Security Configuration is enabled, open Internet Options from the Tools menu and add the URLs described below to the Trusted Sites zone on the Security tab; you may also need to enable Javascript.
To verify the SQDR Plus installation, connect to the SQDR Control Center with a browser by either selecting the SQDR Control Center shortcut in the SQDR Plus program group (Windows only), or by starting a browser and entering the URL http://127.0.0.1:8080/SQDRManager (assuming you accepted the default jetty port values during installation).
You can also connect to the SQDR Control Center from another machine by starting a browser and entering the URL http://mysqdrplus:8080/SQDRManager or https://mysqdrplus:8443/SQDRManager (where mysqdrplus is the hostname of the SQDR Plus platform). Be sure that the firewall has been configured to accept incoming connections on these ports.
If you select the SSL connection and are using the self-signed SSL certificate included with the installation, the browser will issue a warning about the certificate; allow an exception to connect.
When prompted for credentials, enter user SQDR (upper-case) and the Launch Agent Control Database (Derby) password you supplied during installation.
If the browser is unable to connect to the SQDR Control Center, check the following:
- Open the Services control panel and verify that all three SQDR Plus services are started.
- If the services are not started, use the SQDR Plus program group shortcuts to examine the Launch Agent log and Derby log, as well as wrapper.log for each of the three services. The default location of the log files is
C:\ProgramData\Application Data\StarQuest\sqdrplus. - Examine the Windows event log for any errors related to starting the services.
- If the services are running, verify that the ports are not being blocked by a firewall
- Verify that the ports are not in use by another application. Stop the SQDR Plus services and view the ports in use by entering netstat -a -o or by opening the Resource Monitor from the Performance tab of Task Manager and examining the Listening Ports displayed on the Network tab. It is not uncommon for port 8080 to be in use by a Java-based server such as tomcat or a RAID management tool.
- If anti-virus software is installed, verify that it is not interfering with operation.
Step 7: (Tier 1 Source Database Administrator task) Add the Source Database with the SQDR Control Center
Estimated Time: 5 minutes
- Connect to SQDR Control Center with a browser as described in the previous section.
- Logon as user SQDR, using the Launch Agent Control Database (Derby) password as supplied during installation.
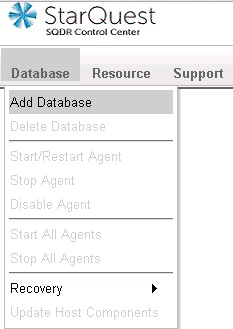
- Select Add Database from the Databases drop-down menu.
- Choose the appropriate source database type (MySQL) and select Continue. You will see the following screen:
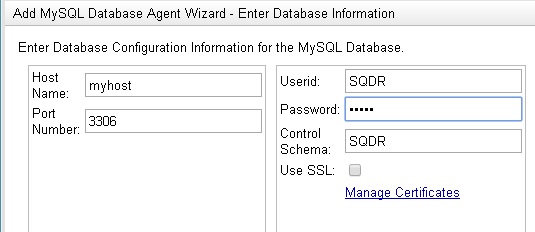
- Enter the following values:.
- Host Name : Host Name or IP address of the source system.
- Port Number: enter the port of the source system (default 3306).
- Userid: a MySQL user on the source system that has been created as described in the Tier 1 prerequisite section above. We recommend using the name SQDR.
- Password: password for the Userid.
- Control schema: use the default value (SQDR) unless there are multiple SQDR Plus systems accessing this host database. SQDR Plus will create a database on the host database and populate it with control tables.
- Use SSL: If you wish to use SSL (Secure Sockets Layer) to connect to the MySQL source system, select the Use SSL checkbox and select Manage Certificates to open a new browser window where you can add the MySQL system's Certificate Authority certificate. After adding the certificate, you can close the new browser window and continue with the wizard to Add a Database. See Configuring SSL to MySQL Source in the Control Center help for details.
- Select the Next button. You will see the following screen:
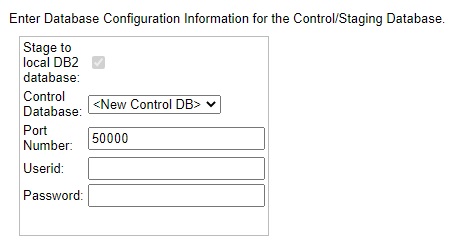
- Enter the following values:
.
- Stage to local DB2 database: enabled (default)
- The values below Stage to local DB2 database refer to the local DB2 for LUW database system which was installed as part of the Tier 2 SQDR Plus Platform Prerequisites above.
- Choose an existing database from the Control Database dropdown,.or enter the following values to create a new database:
- Port Number: enter the port of the local DB2 database. Default is 50000.
- Userid: enter sqdr.
- Password: enter the password of the Windows or Linux user sqdr created on the SQDR Plus platform as part of the Tier 2 SQDR Plus Platform Prerequisite above.
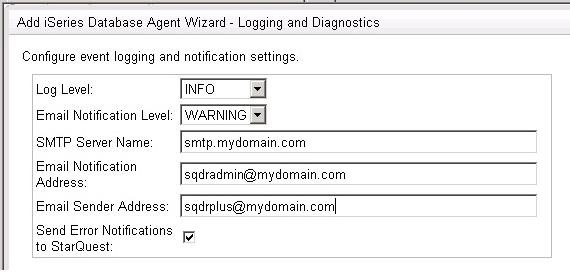
- Select the Next button and configure the logging and optional email notification values. You can leave these fields blank during the installation and configure the email notification feature at a later time.
- Select Next to create the Agent. This operation will take several minutes.
- Verify that the new DB2 LUW control database (e.g. SQDRP0) was created on the desired drive (as specified in task 3 in Step 7 above) - e.g. if you specified the D: drive, expand D:\DB2 and look for a folder named SQDRP0.
- When you see a plus sign next to Databases, expand Databases and select the new database.
- Choose Start/Restart Agent from the Database drop-down menu.
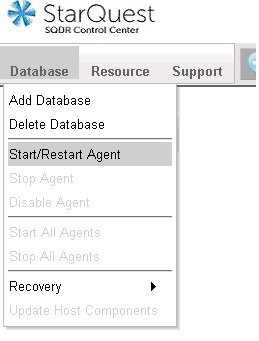
Selecting Start/Restart Agent creates the Staging Agent on the SQDR Plus system and creates configuration tables and stored procedures on the source system. This process may take several minutes; a green checked icon will appear next to the database name when the process is complete. If the icon remains red or yellow, additional troubleshooting may be required before proceeding.
After creating a MySQL agent and before creating an SQDR source in Data Replicator Manager, use either the agent user (SQDR) or another user with sufficient authority (e.g. root) to grant read access to SQDR.SQ_PROPERTIES to the SQDR client user. Otherwise, SQDR will not know that MySQL is enabled for incremental replication - the checkbox and dropdown on the Advanced panel of Source setup in Data Replicator Manager will be greyed out.
GRANT SELECT ON SQDR.SQ_PROPERTIES TO SQDRUSER
Step 8: (DB2 Administrator task) Verify SQDR Plus Installation using SQDR Control Center
Estimated Time: 5 minutes
Use the SQDR Control Center to verify that the Capture Agent is running and to test the Publication and Support functions.
- Connect to SQDR Control Center with a browser and logon as described above.
- Expand Databases and select the desired database. Verify that the Staging Agent is running by observing that there is a green checked icon next to the database name.
- Verify that the SQDR Plus platform can send SQDR Plus support logs to StarQuest Customer Support by selecting Send Logs to StarQuest from the Support drop-down menu. This will collect and transfer support files directly to StarQuest. If the SQDR Plus platform is not able to reach external ftp sites, select Save Logs to local file system (as zip file) to create and store the support files on an alternative computer. Send these files to StarQuest Customer Support if requested to do so.
- Test the Publication function. Note that publishing tables before creating subscriptions is required for Oracle source databases.
- Select the Agent and then select the Publications panel in the right window.
- Next select Add Publication from the Resource drop-down menu or the Plus sign from the top of the window.
- For DB2 for i and Oracle source databases, you will be prompted for the credentials of a user with sufficient authority to grant access to the Agent user (e.g. SQDR) for the tables to be subscribed to; this will typically be a user with SECOFR or SYSTEM authority.
- Enter schema and table names (you can use SQL wildcards like %).
- Click Search
- Select one or more tables to be published. A state of "Published" indicates a successful publication.

Next Steps
Continue with the appropriate version of Quick Start Guide to Using SQDR Plus (Part 2), which describes configuring and running SQDR on the Tier 3 platform.
DISCLAIMER
The information in technical documents comes without any warranty or applicability for a specific purpose. The author(s) or distributor(s) will not accept responsibility for any damage incurred directly or indirectly through use of the information contained in these documents. The instructions may need to be modified to be appropriate for the hardware and software that has been installed and configured within a particular organization. The information in technical documents should be considered only as an example and may include information from various sources, including IBM, Microsoft, and other organizations.